пятница, 30 марта 2018 г.
Residential Custom Wine Cellars Chicago, Illinois – White Design Project
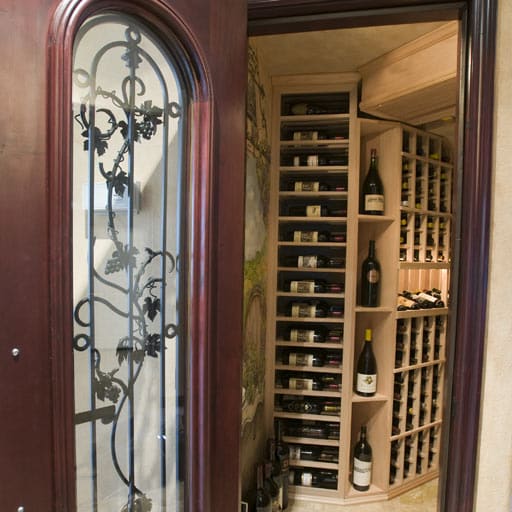
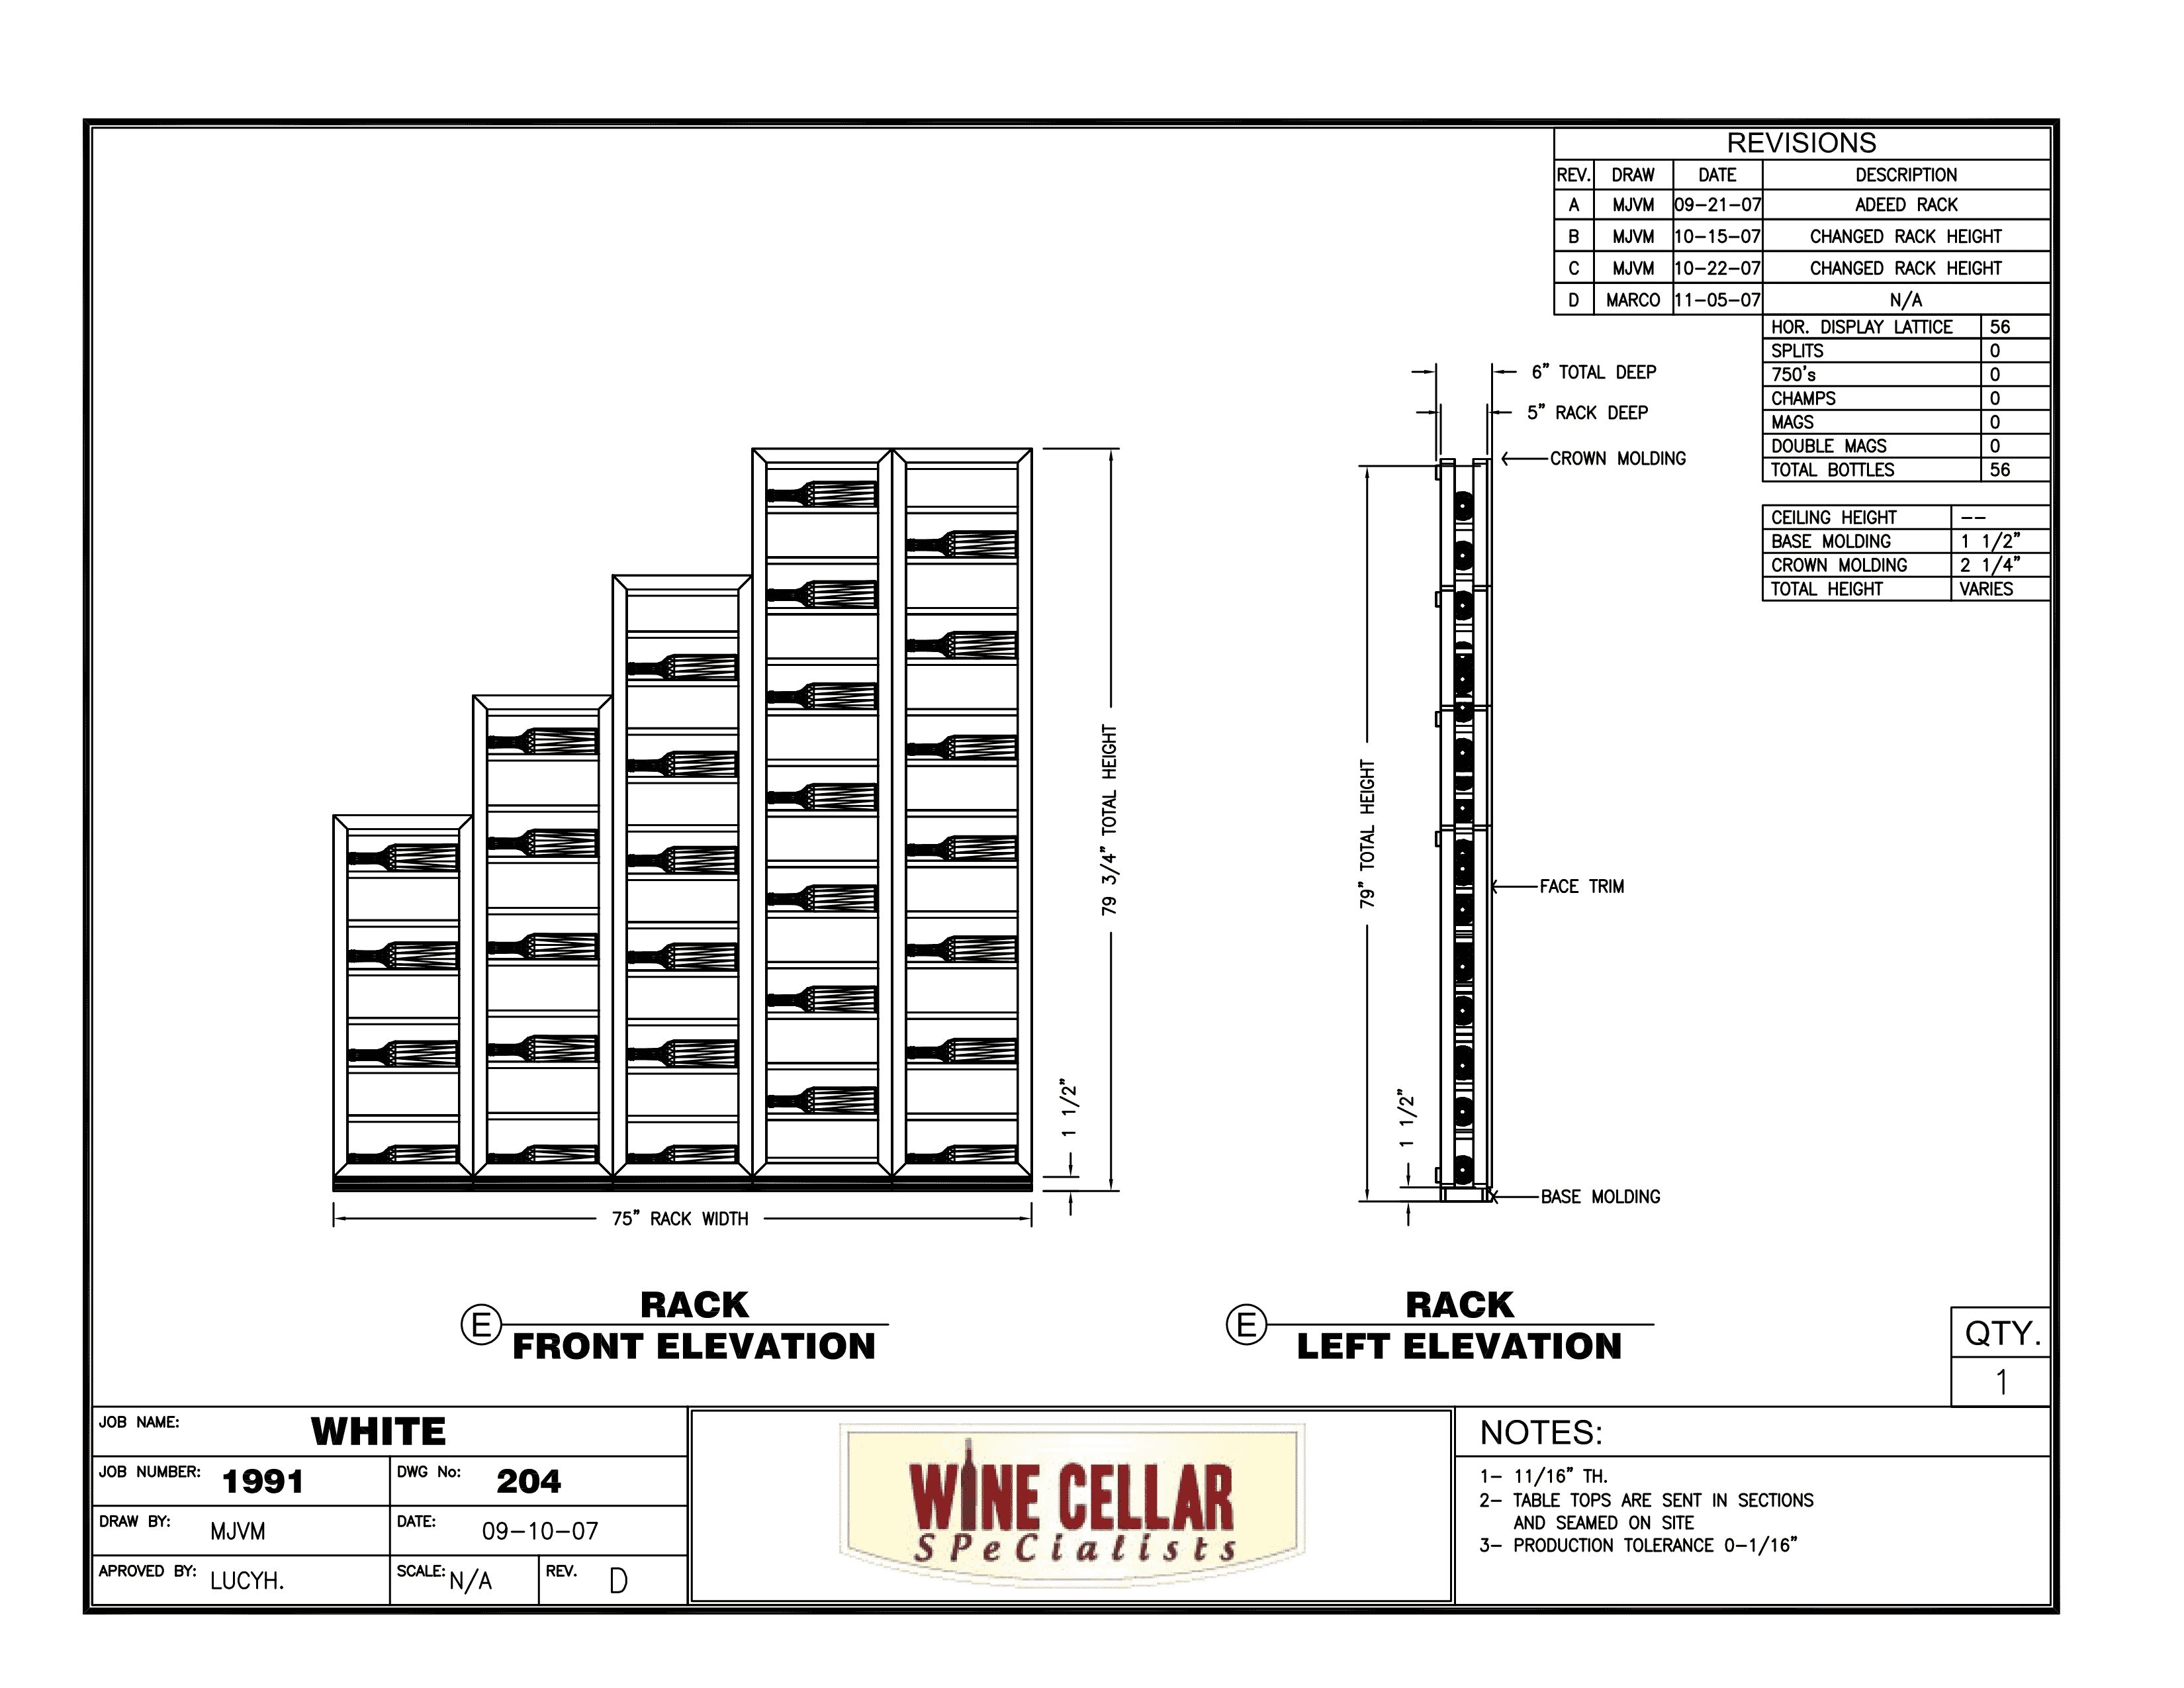
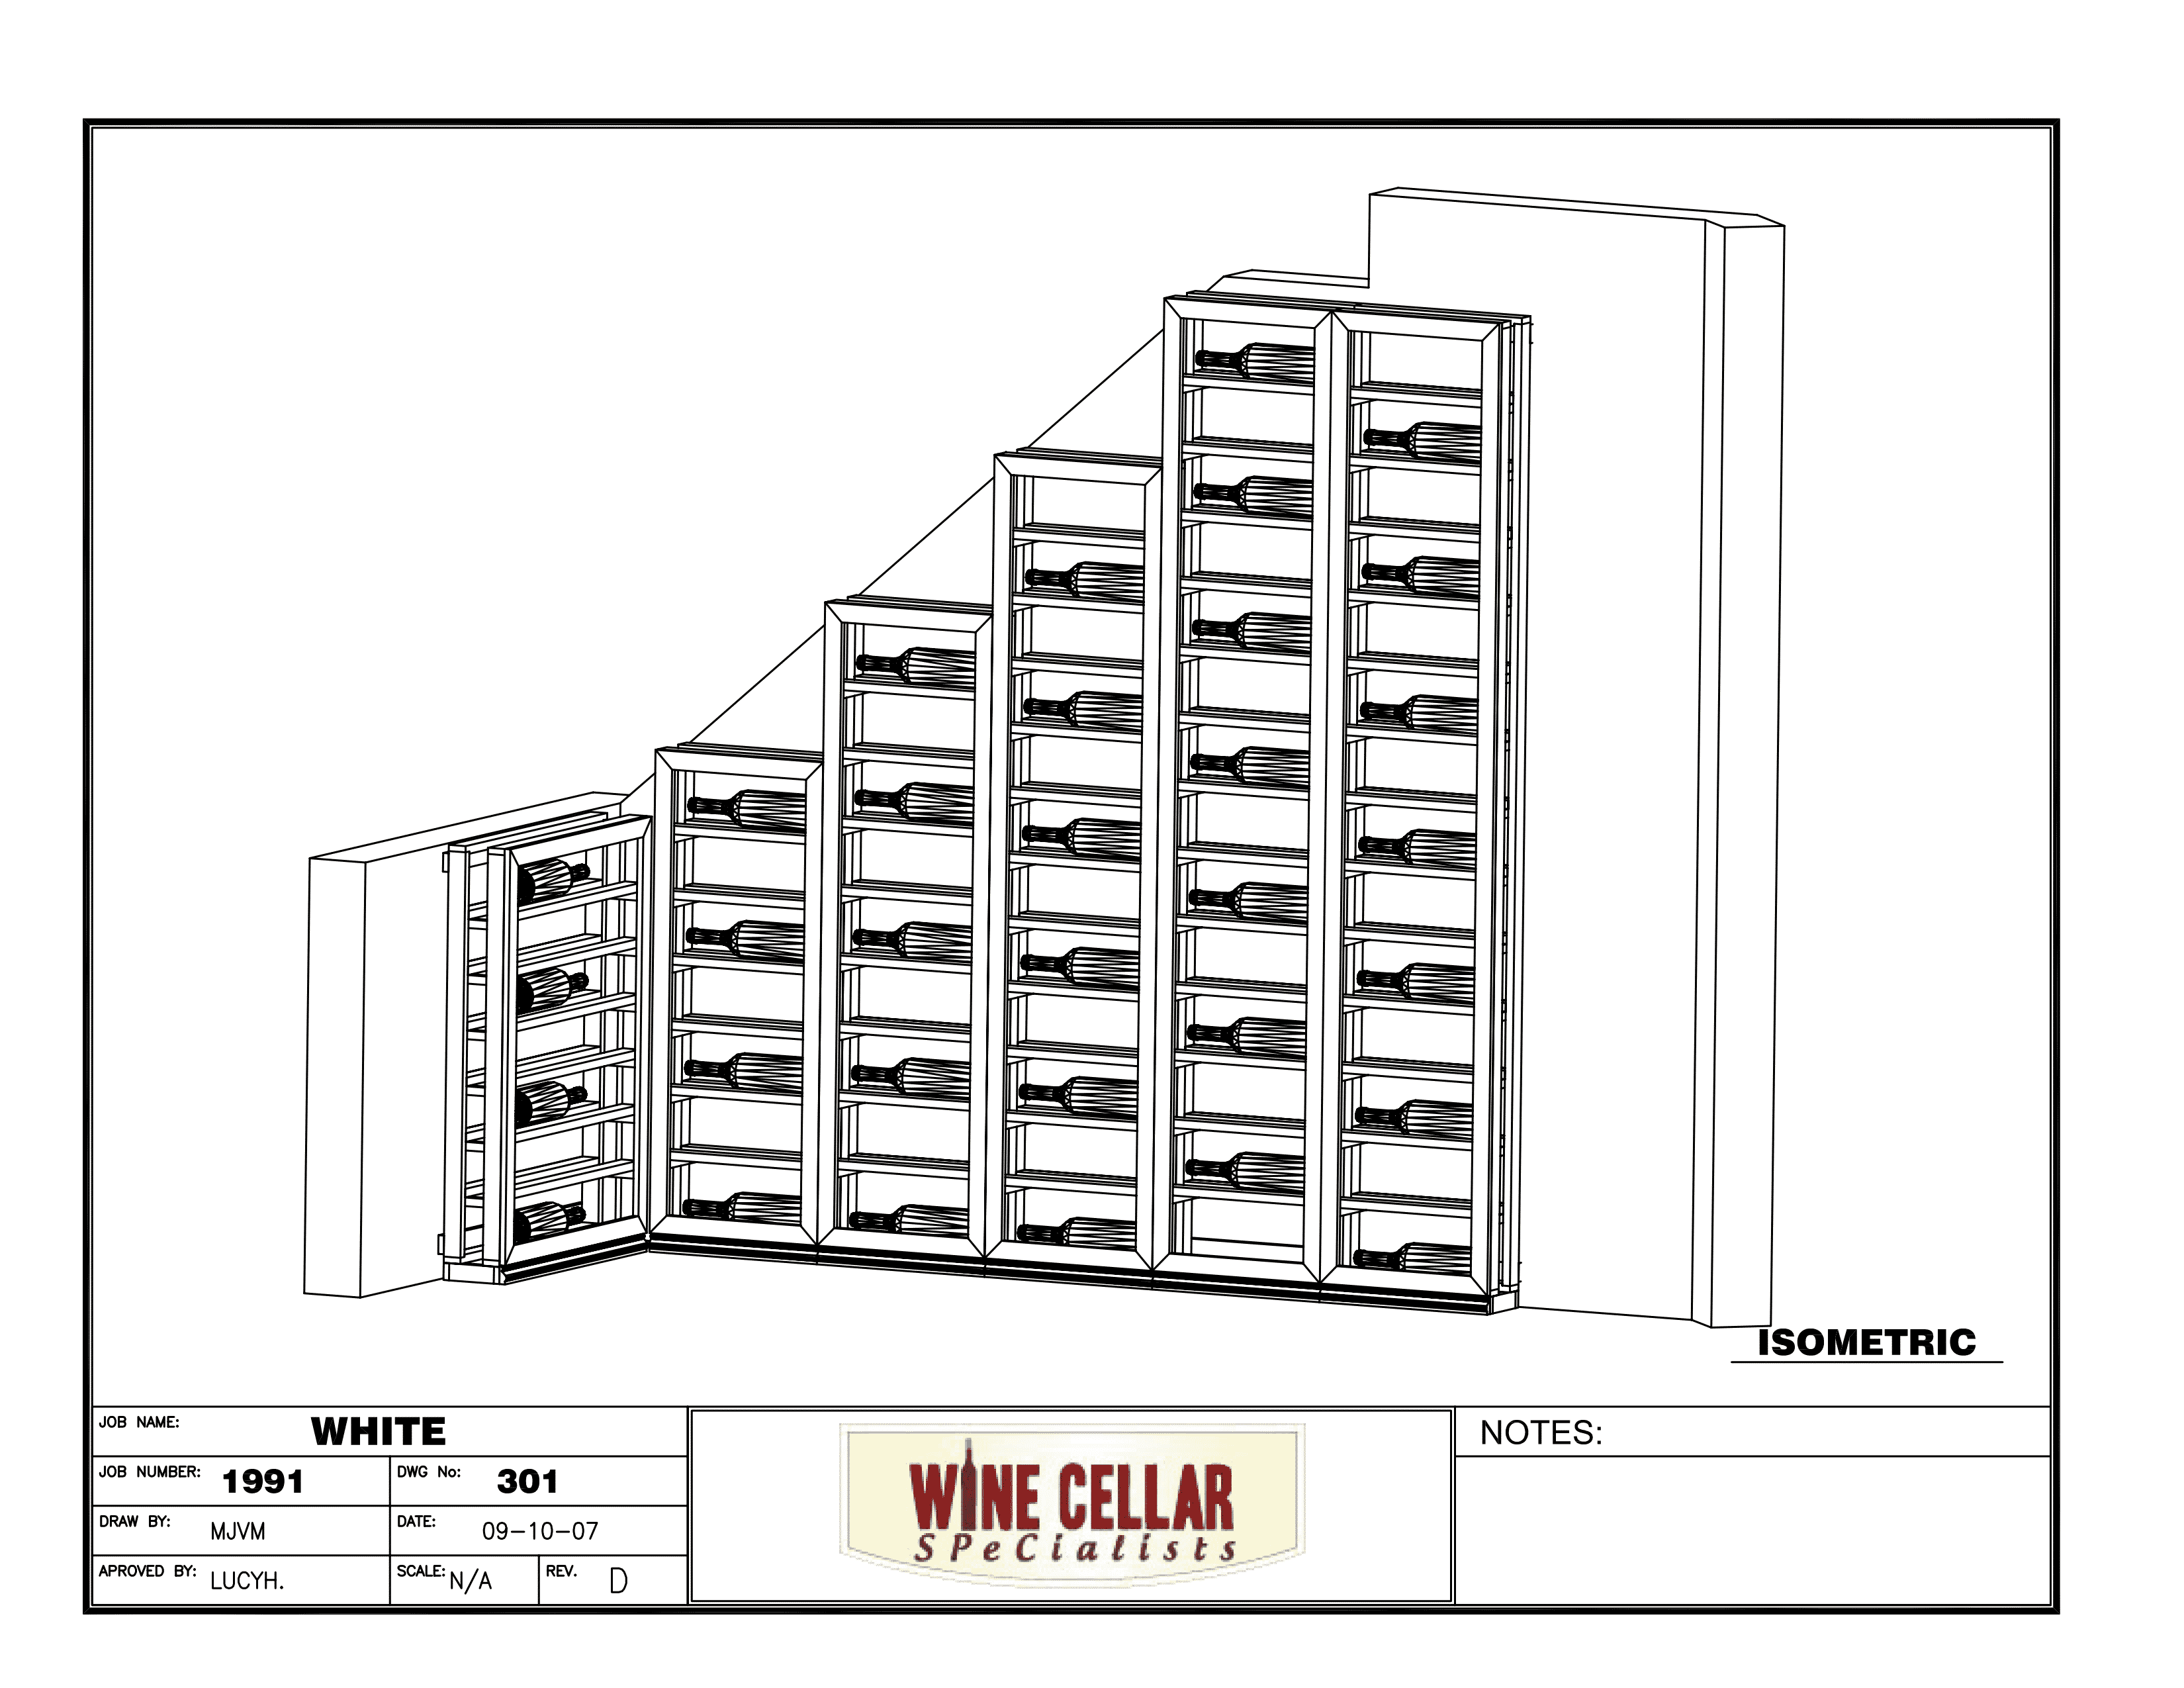
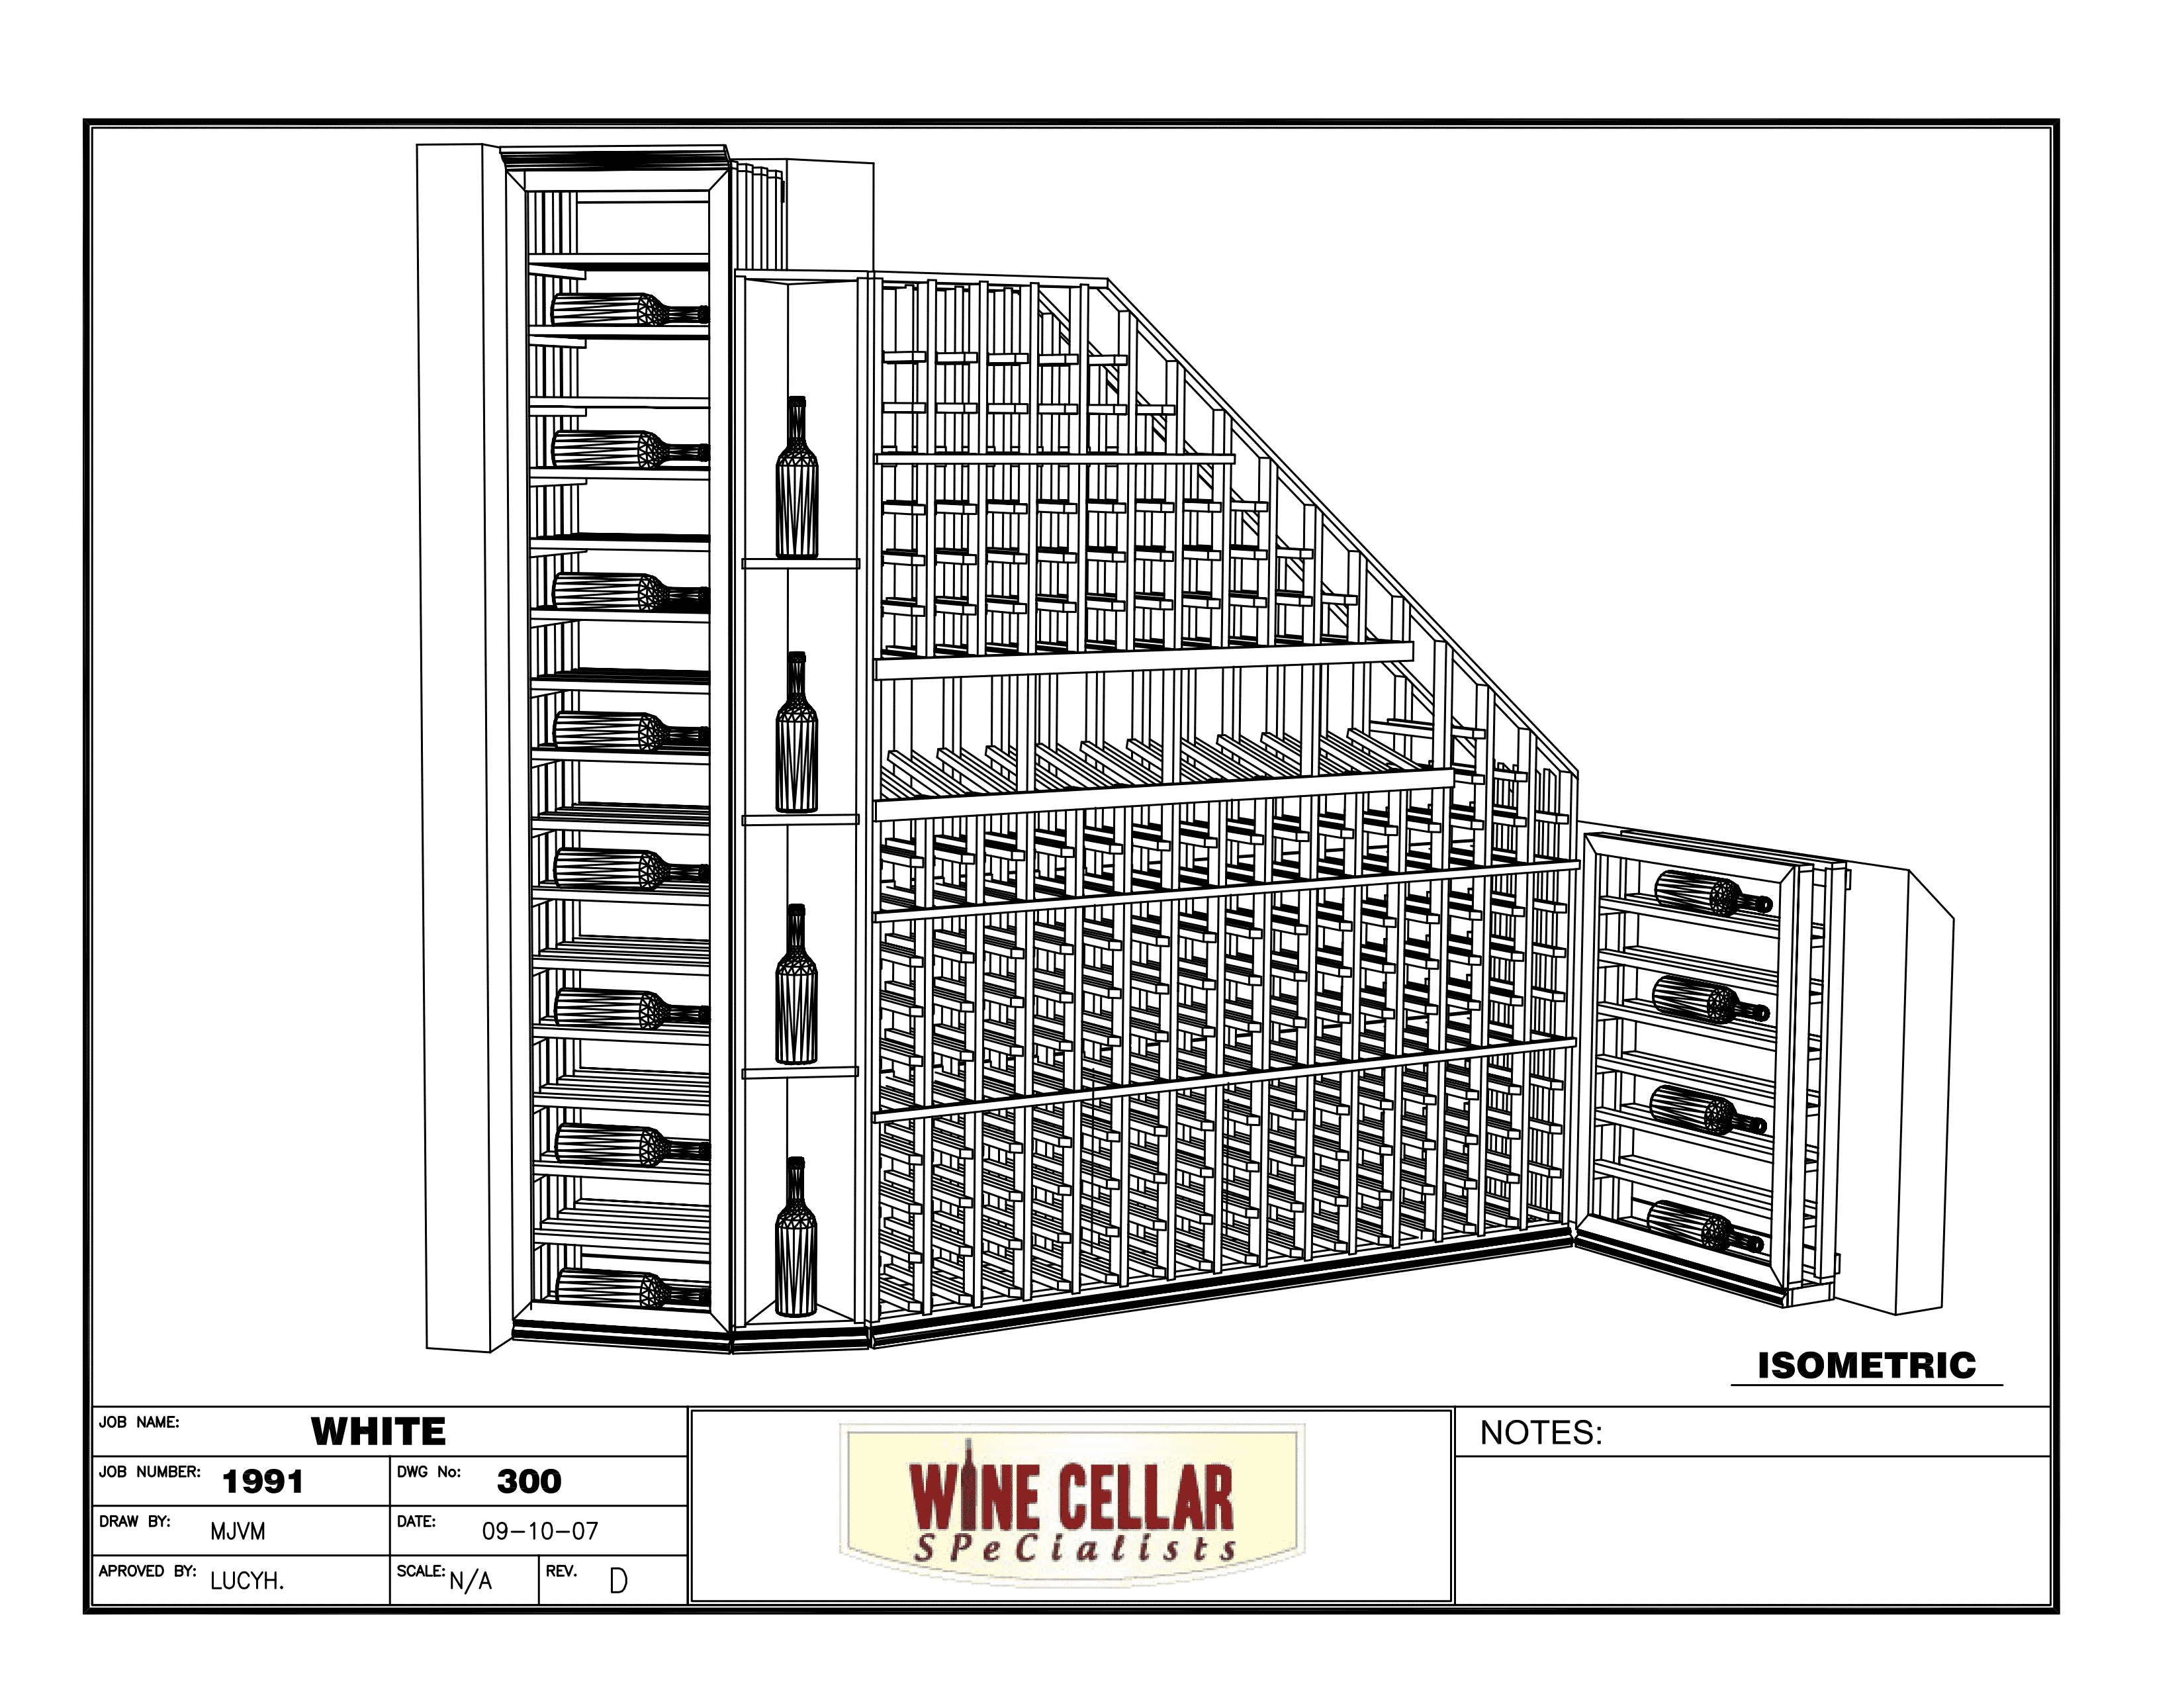
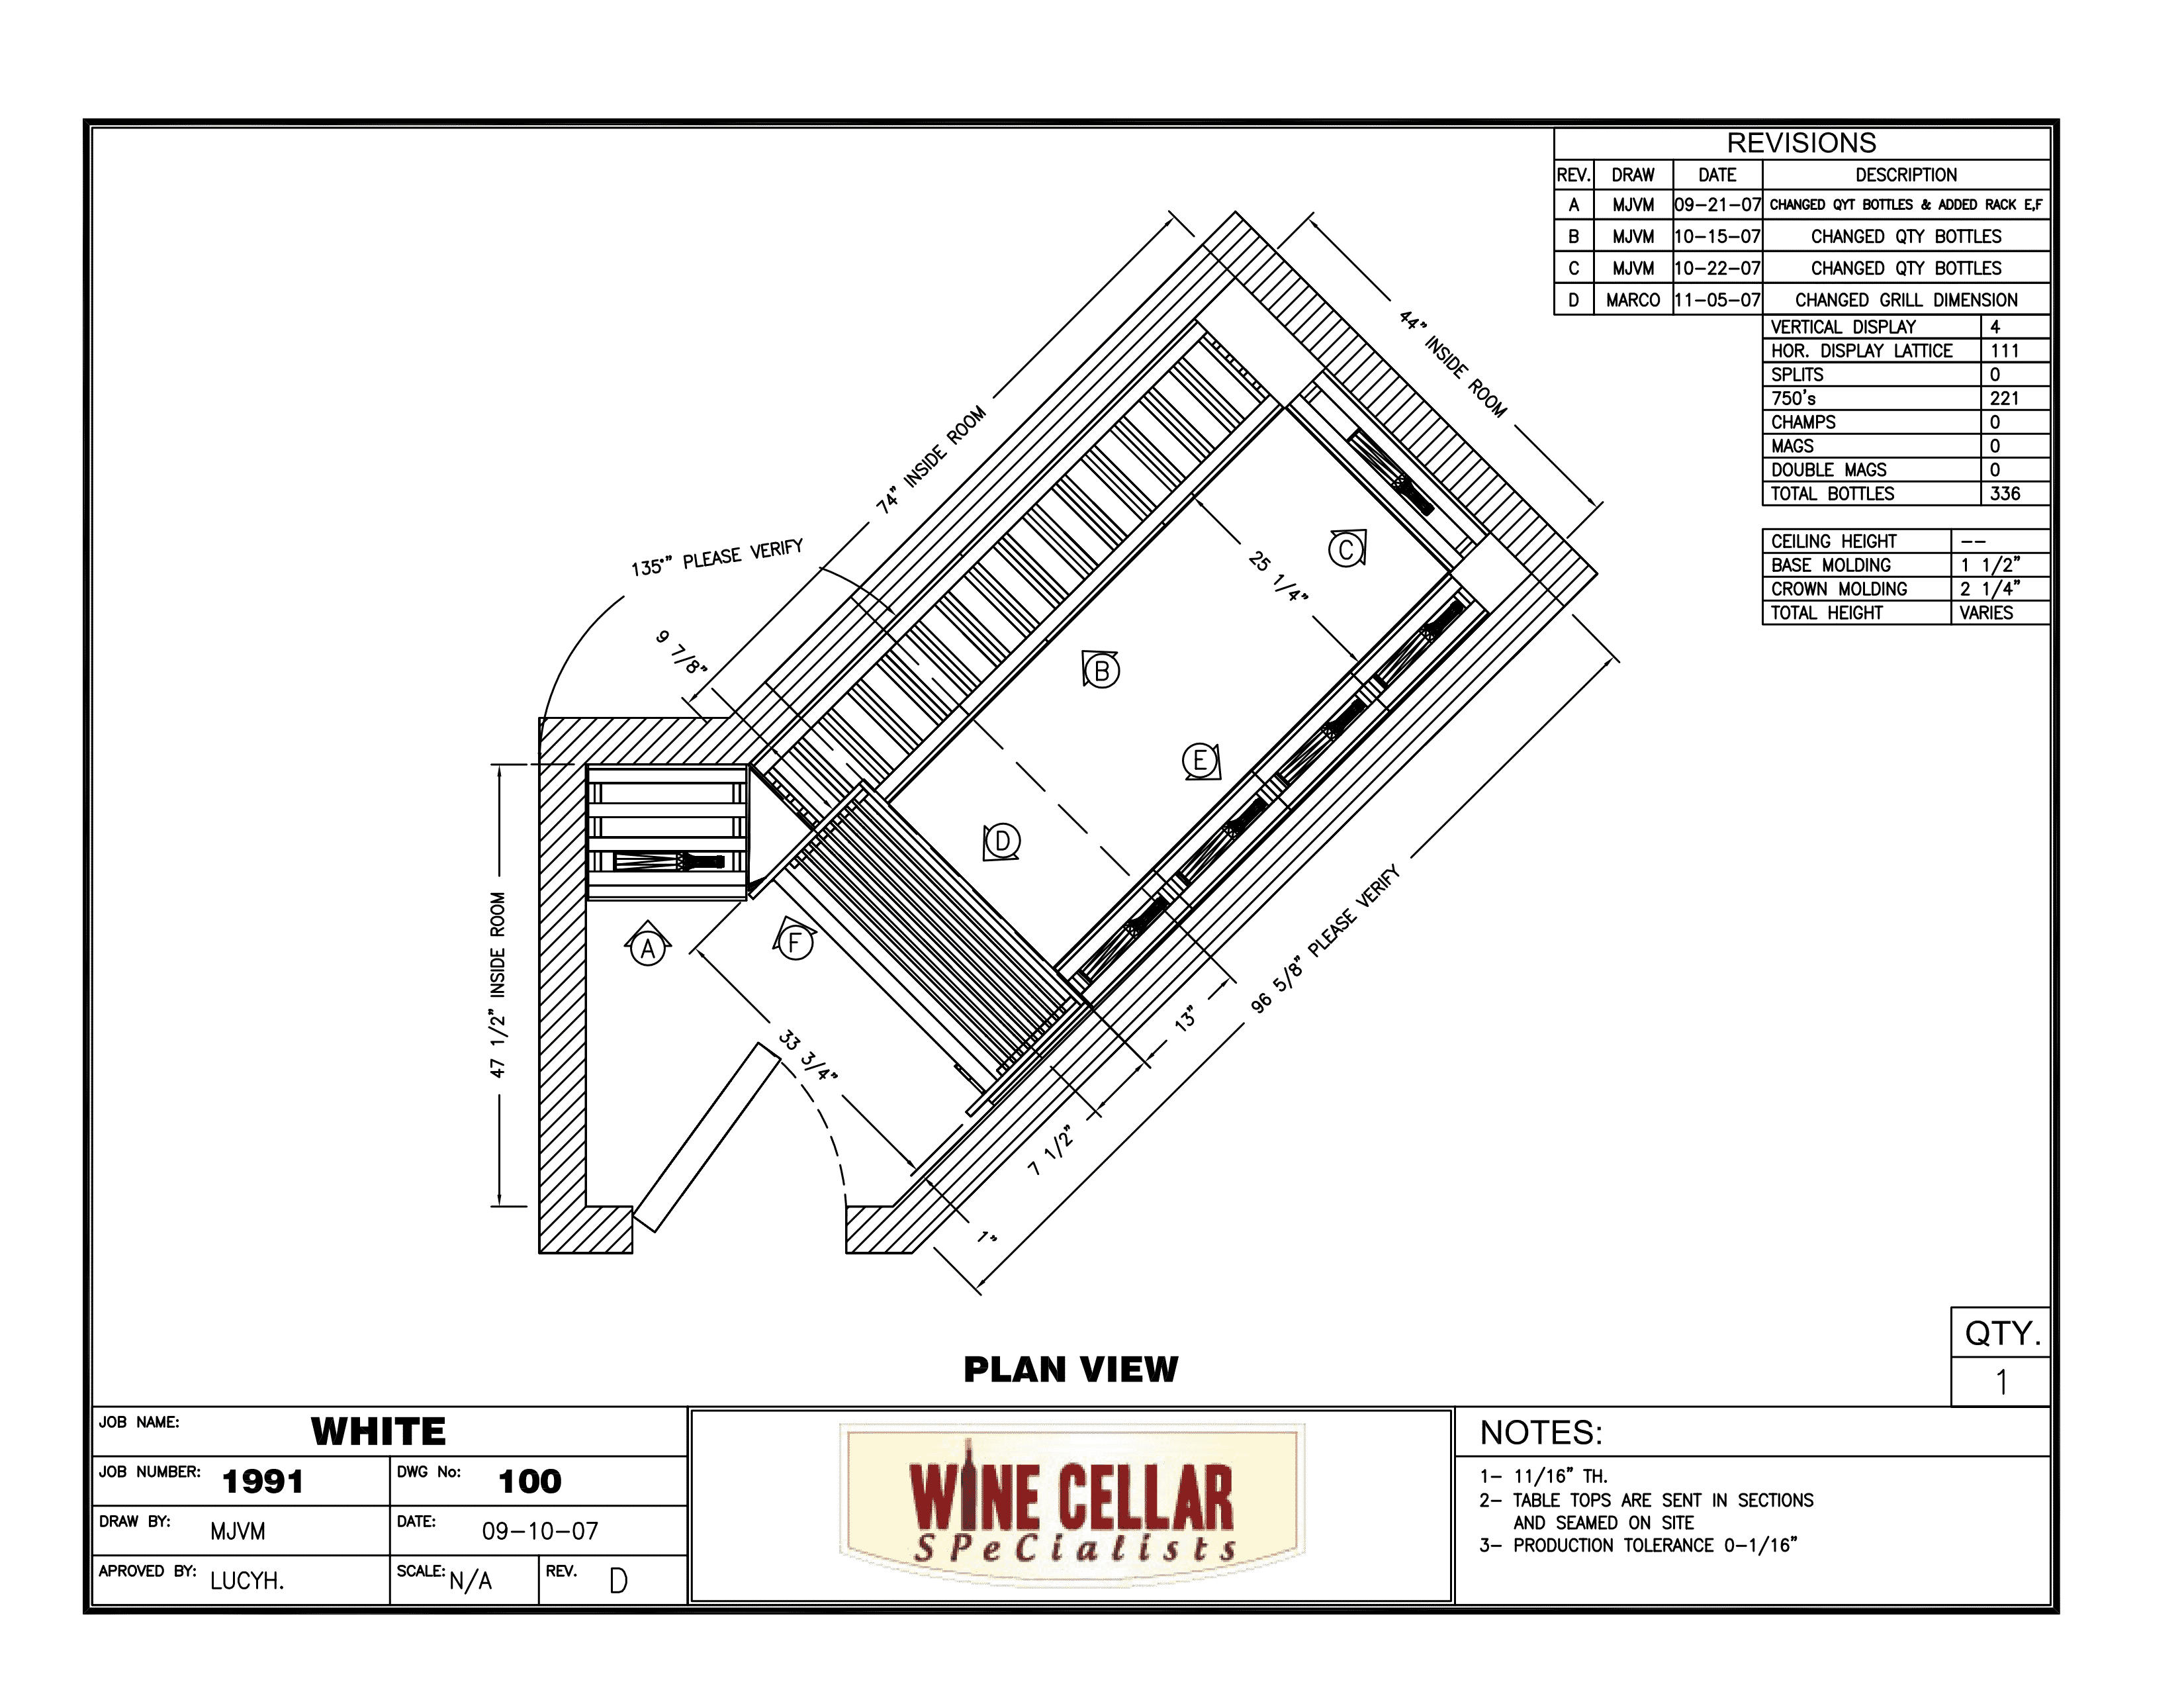
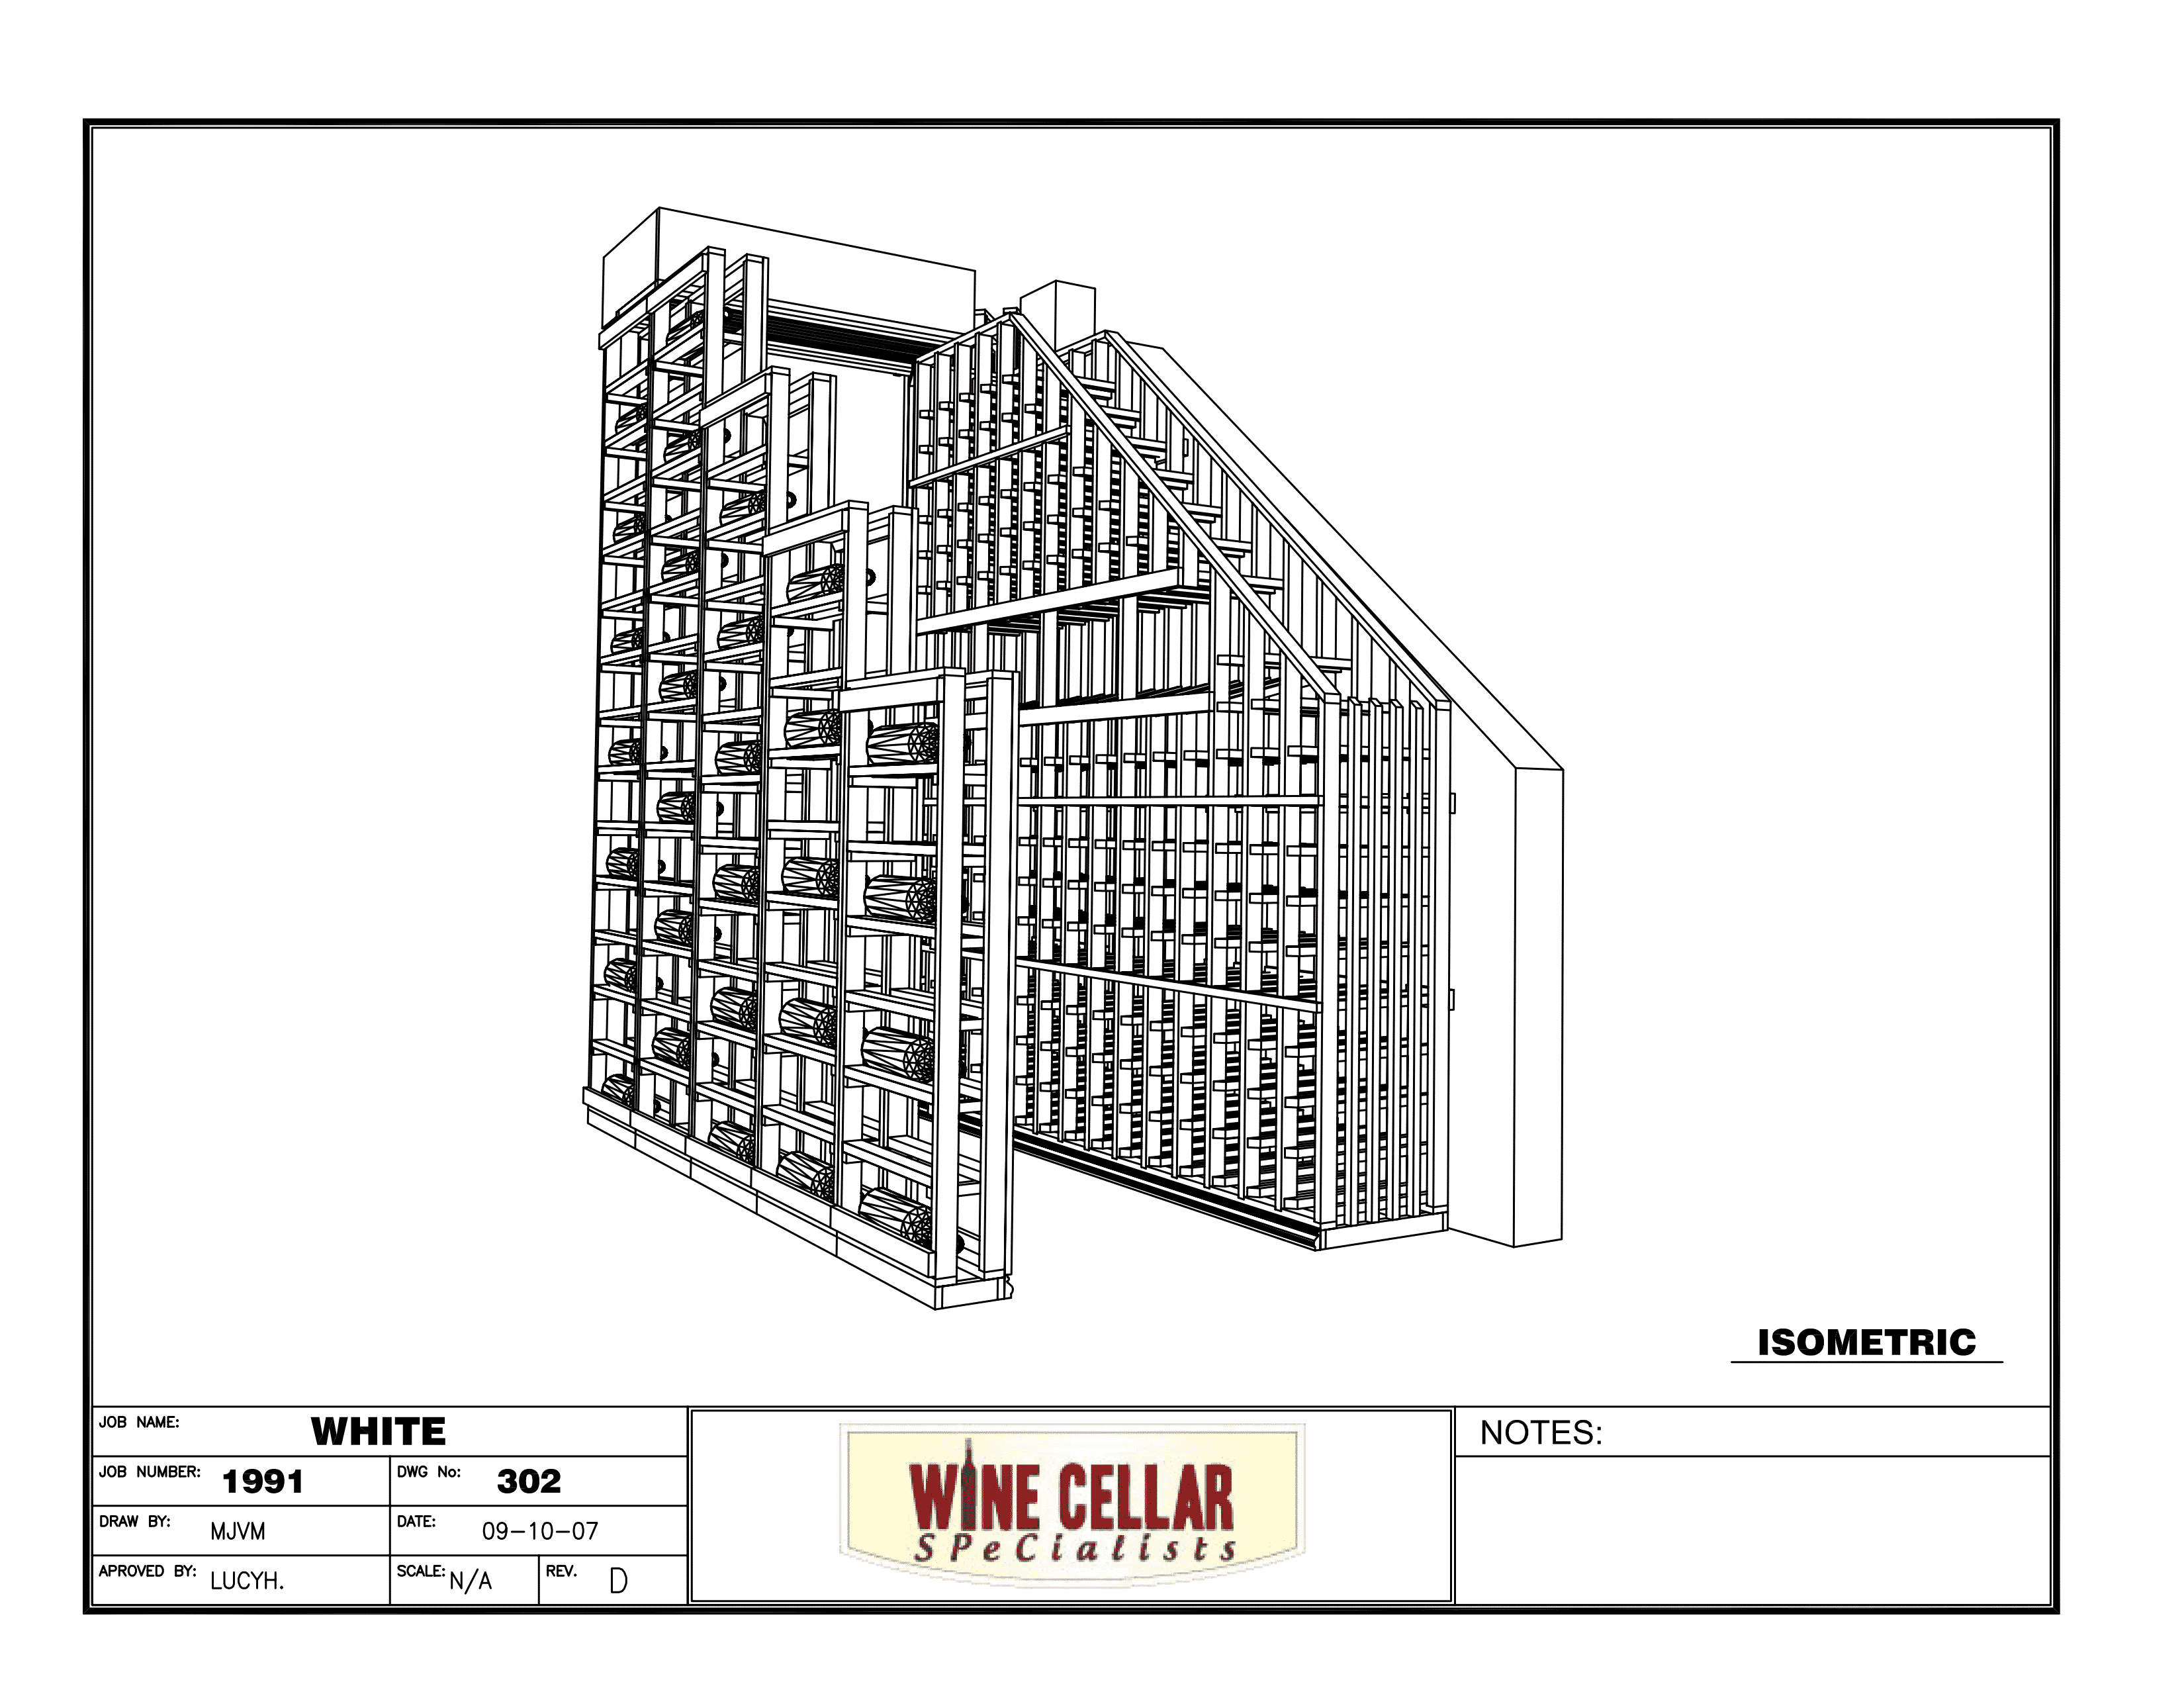
This Residential Custom Wine Cellar project in Chicago, Illinois, presented several design challenges as there where a number of unusual constraints we had to deal with due to the unusual nature of the room to be converted. As it was situated under some stairs, it had a sloping ceiling and a very odd angled shape. Custom wine cellars like this can be particularly tricky to design.

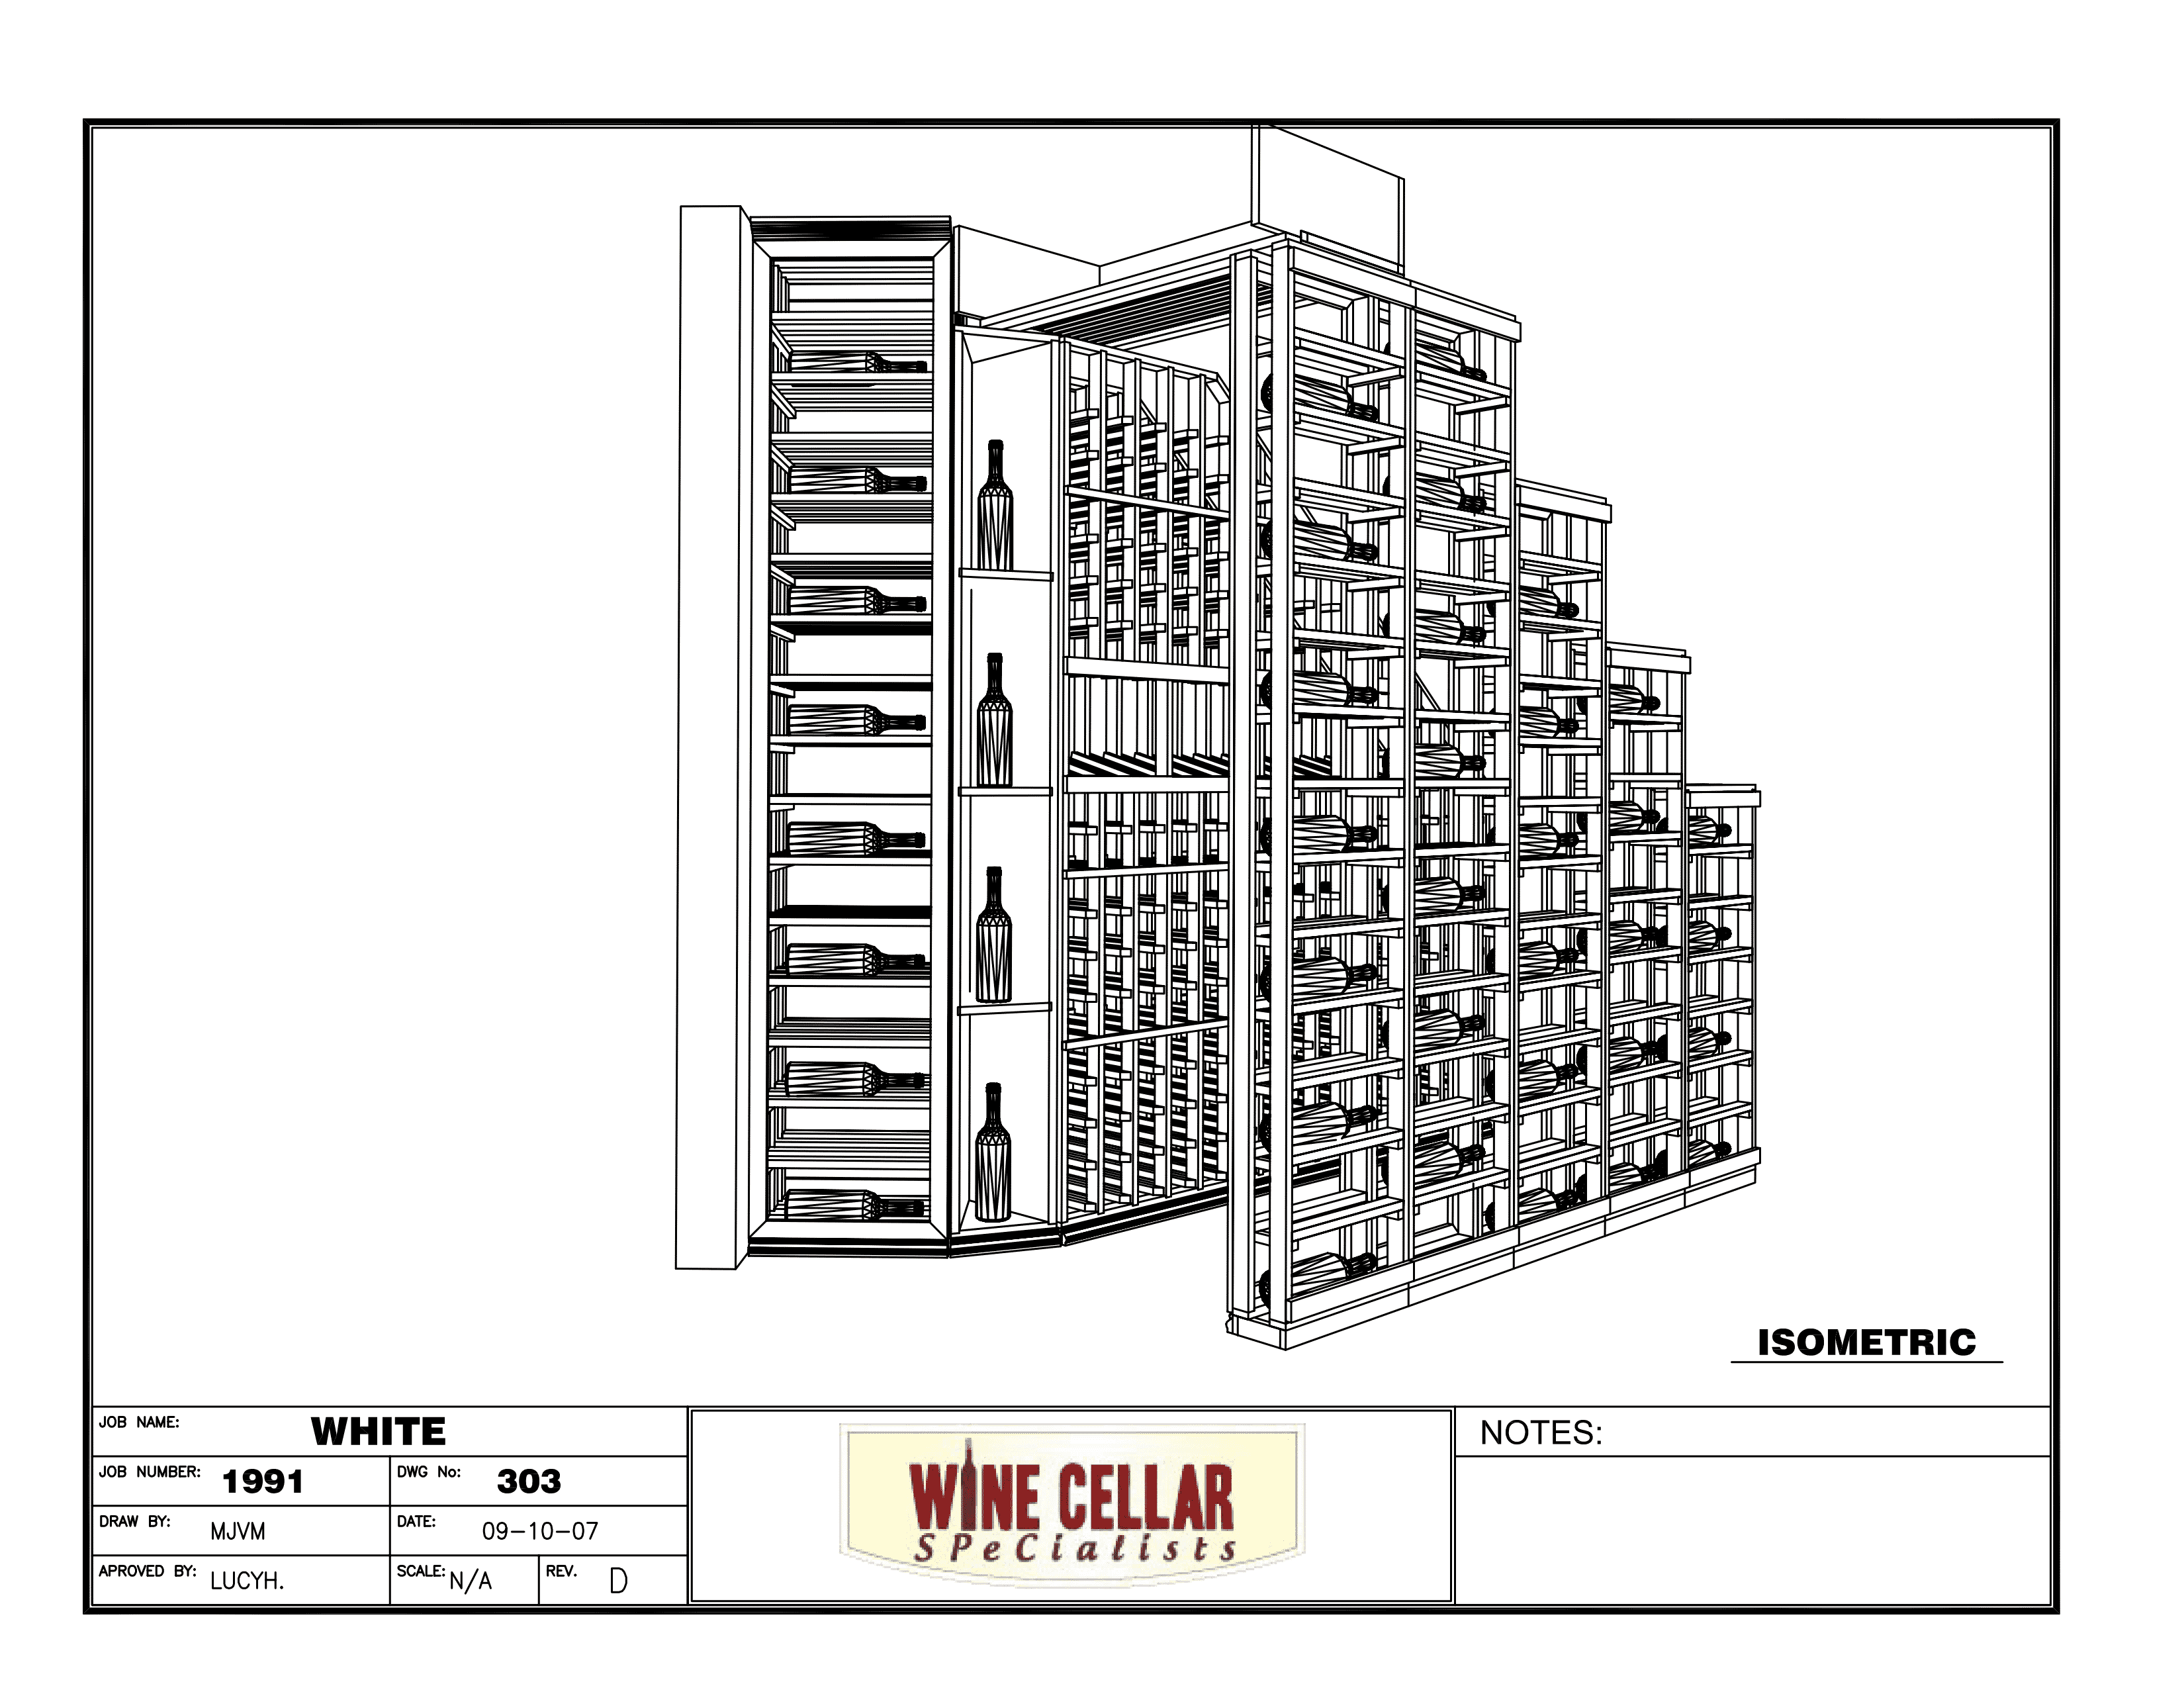
Our challenge was how to build a wine room that would be great looking, have a full wine cellar cooling system whilst also maximizing its wine storage capacity. To get the best design we possibly could, we made full use of our creative team to produce several three dimensional drawings, trying different layouts until we found the optimal wine cellar design.
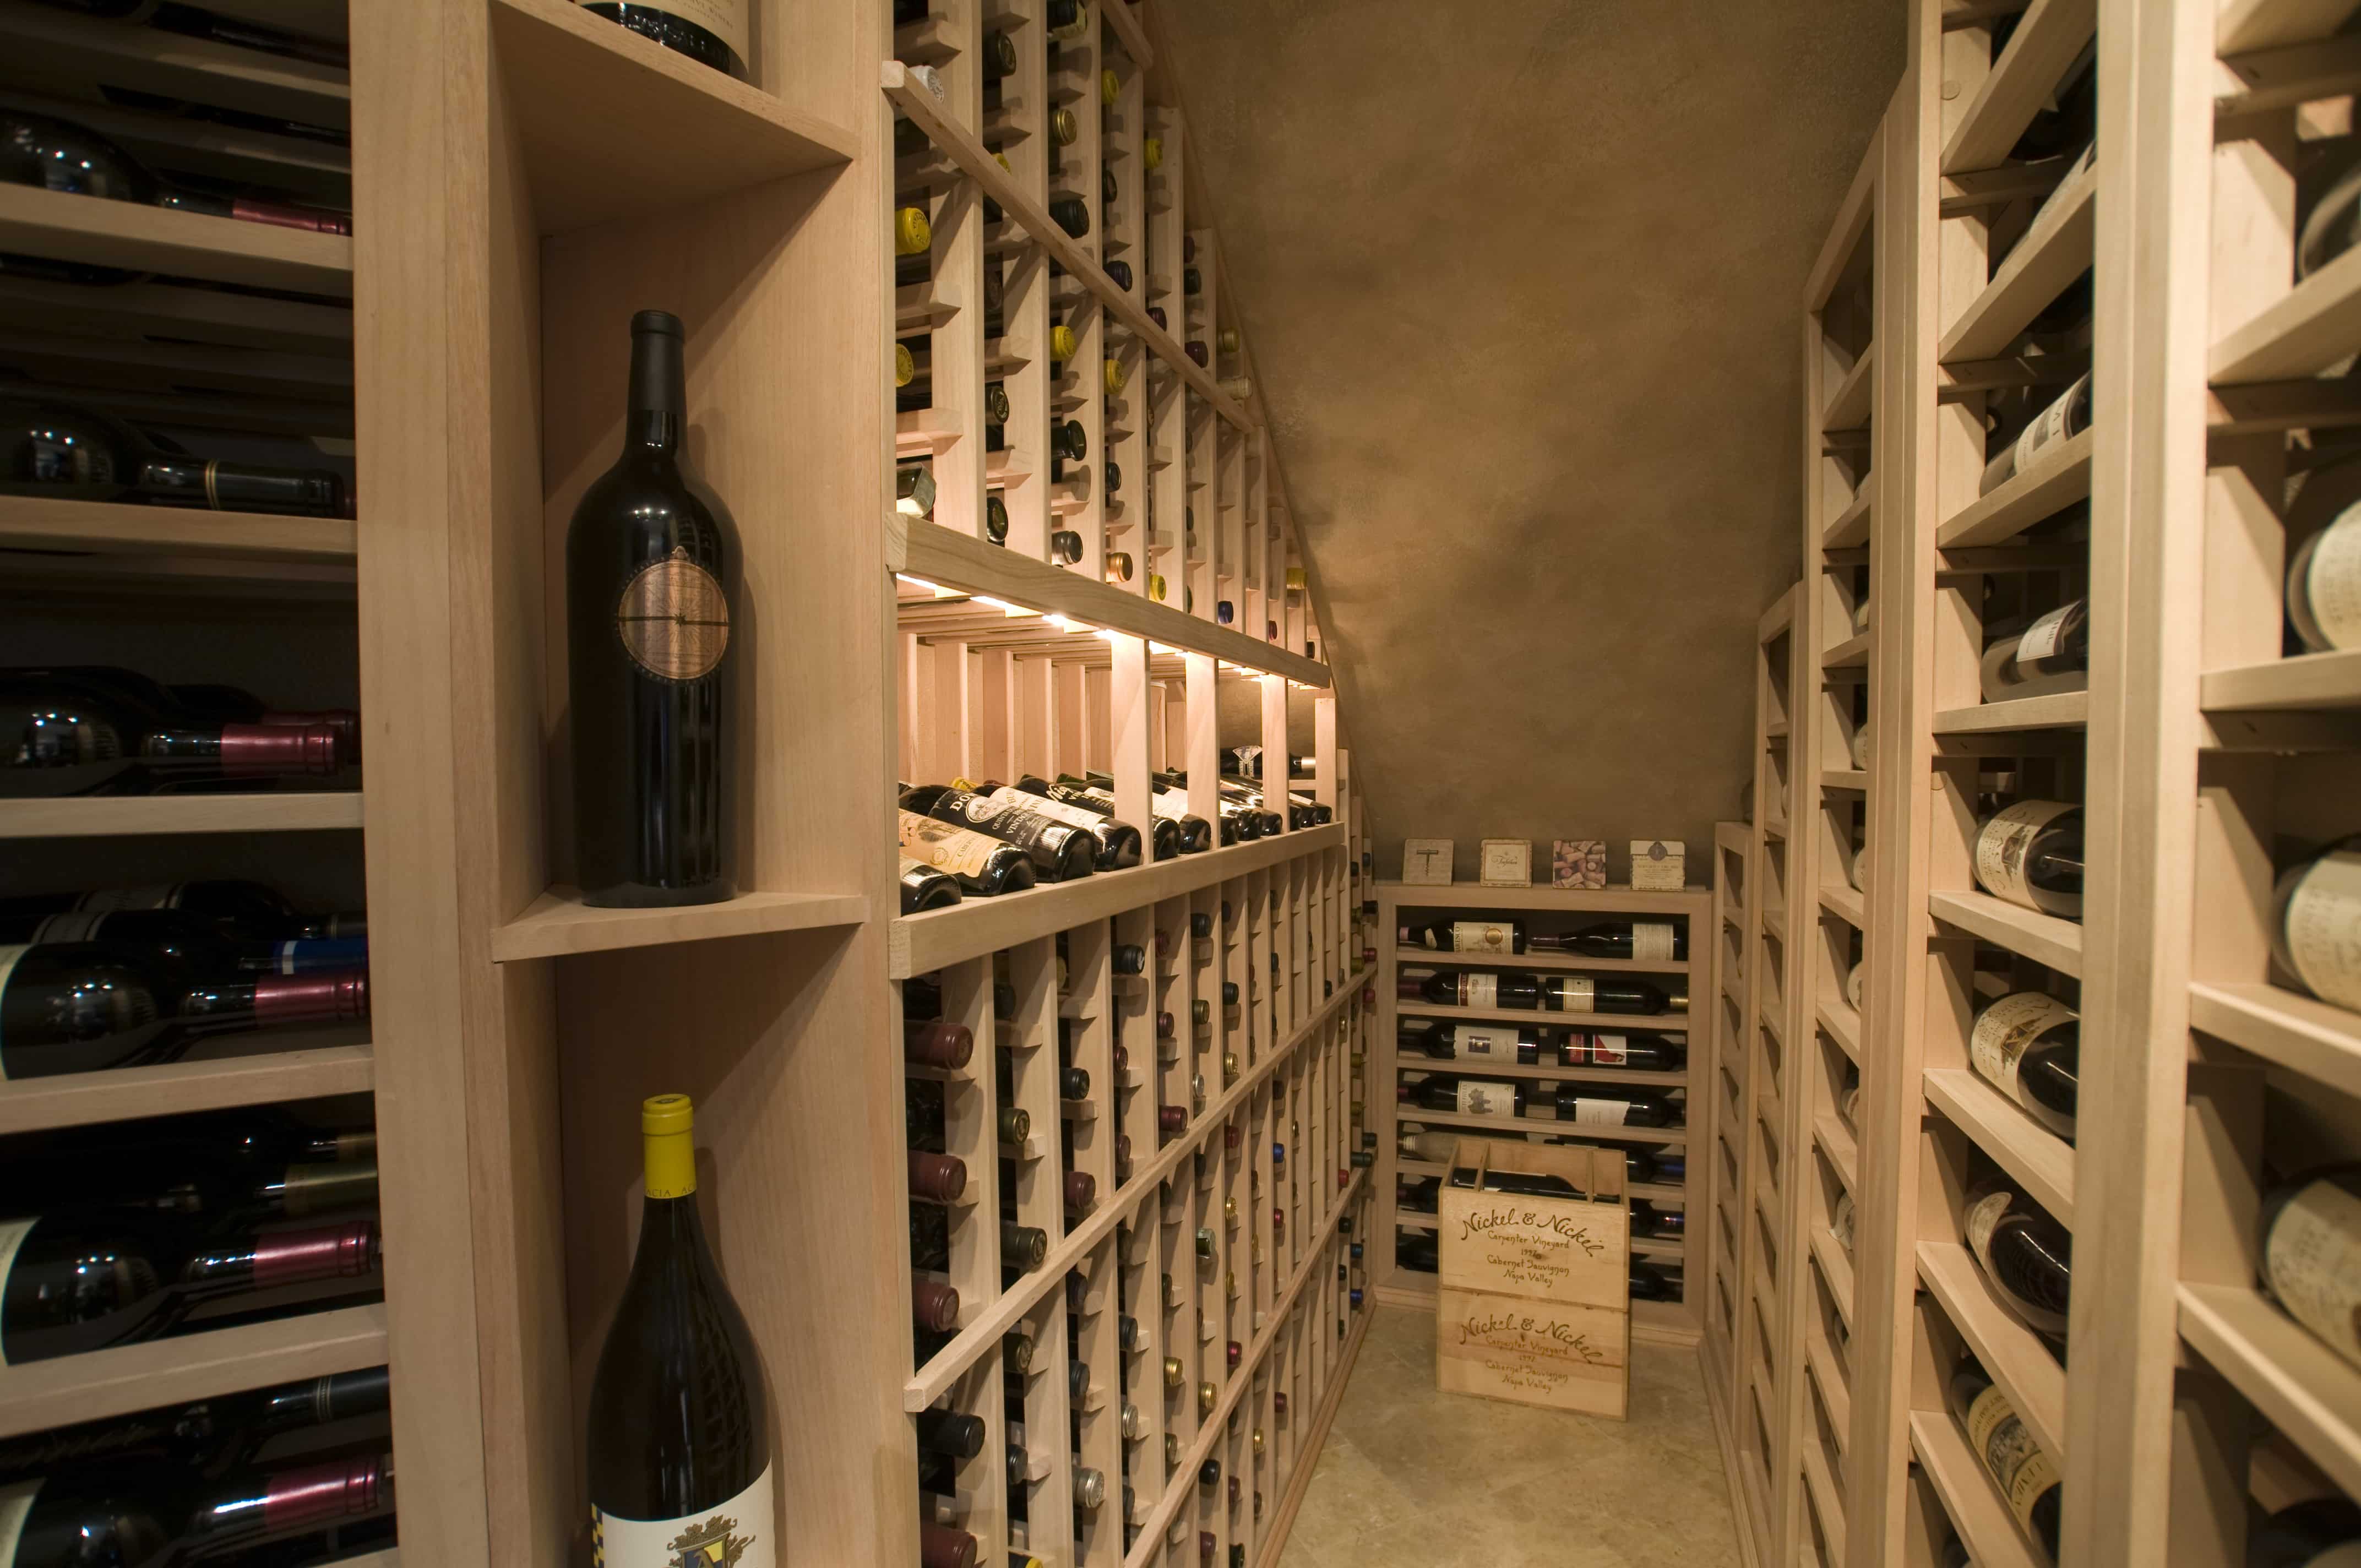
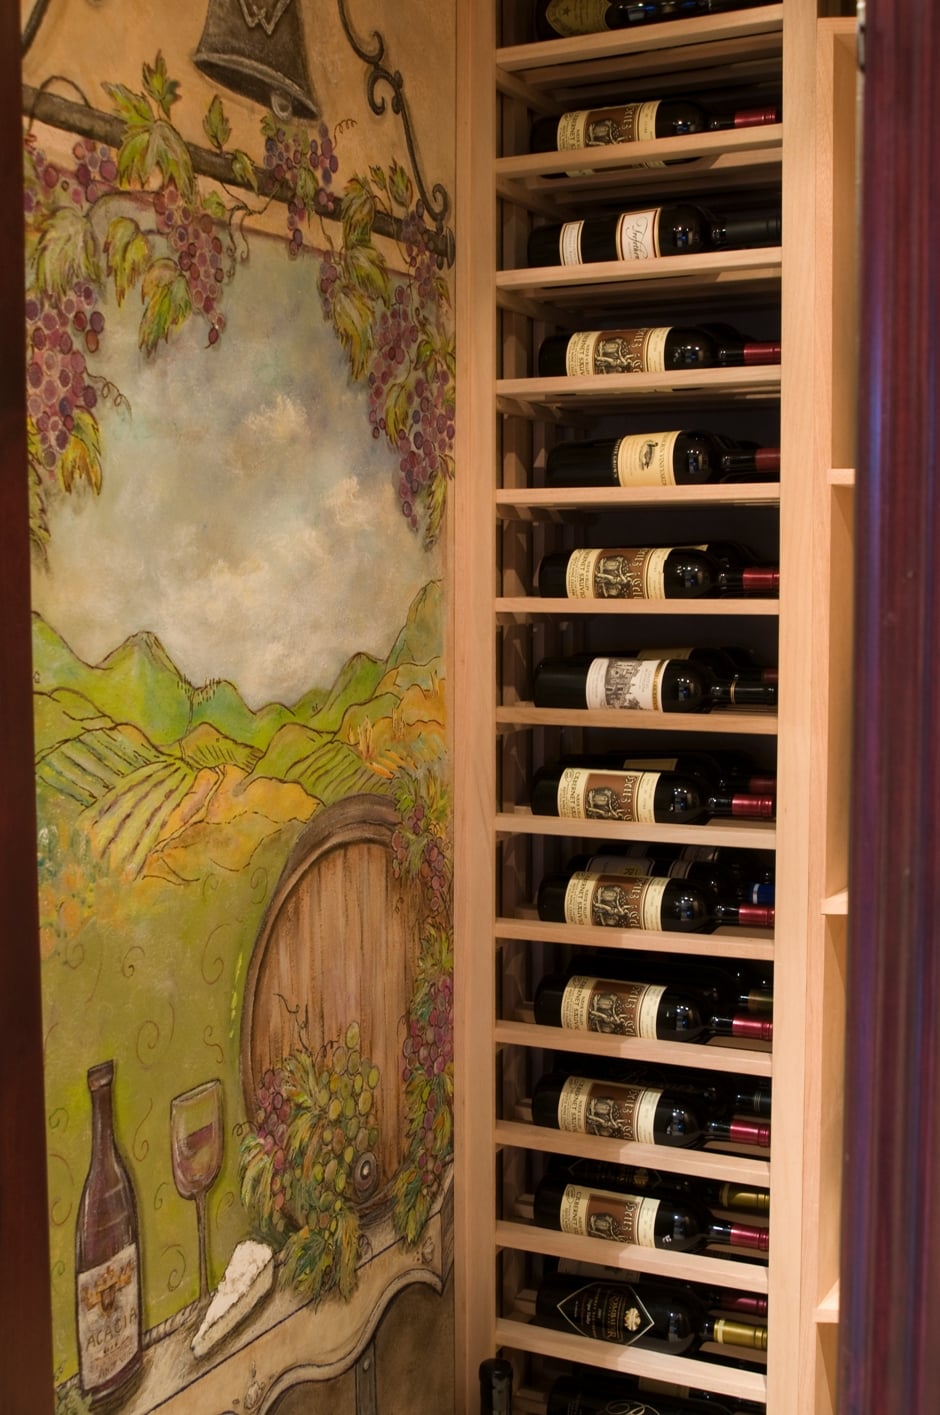
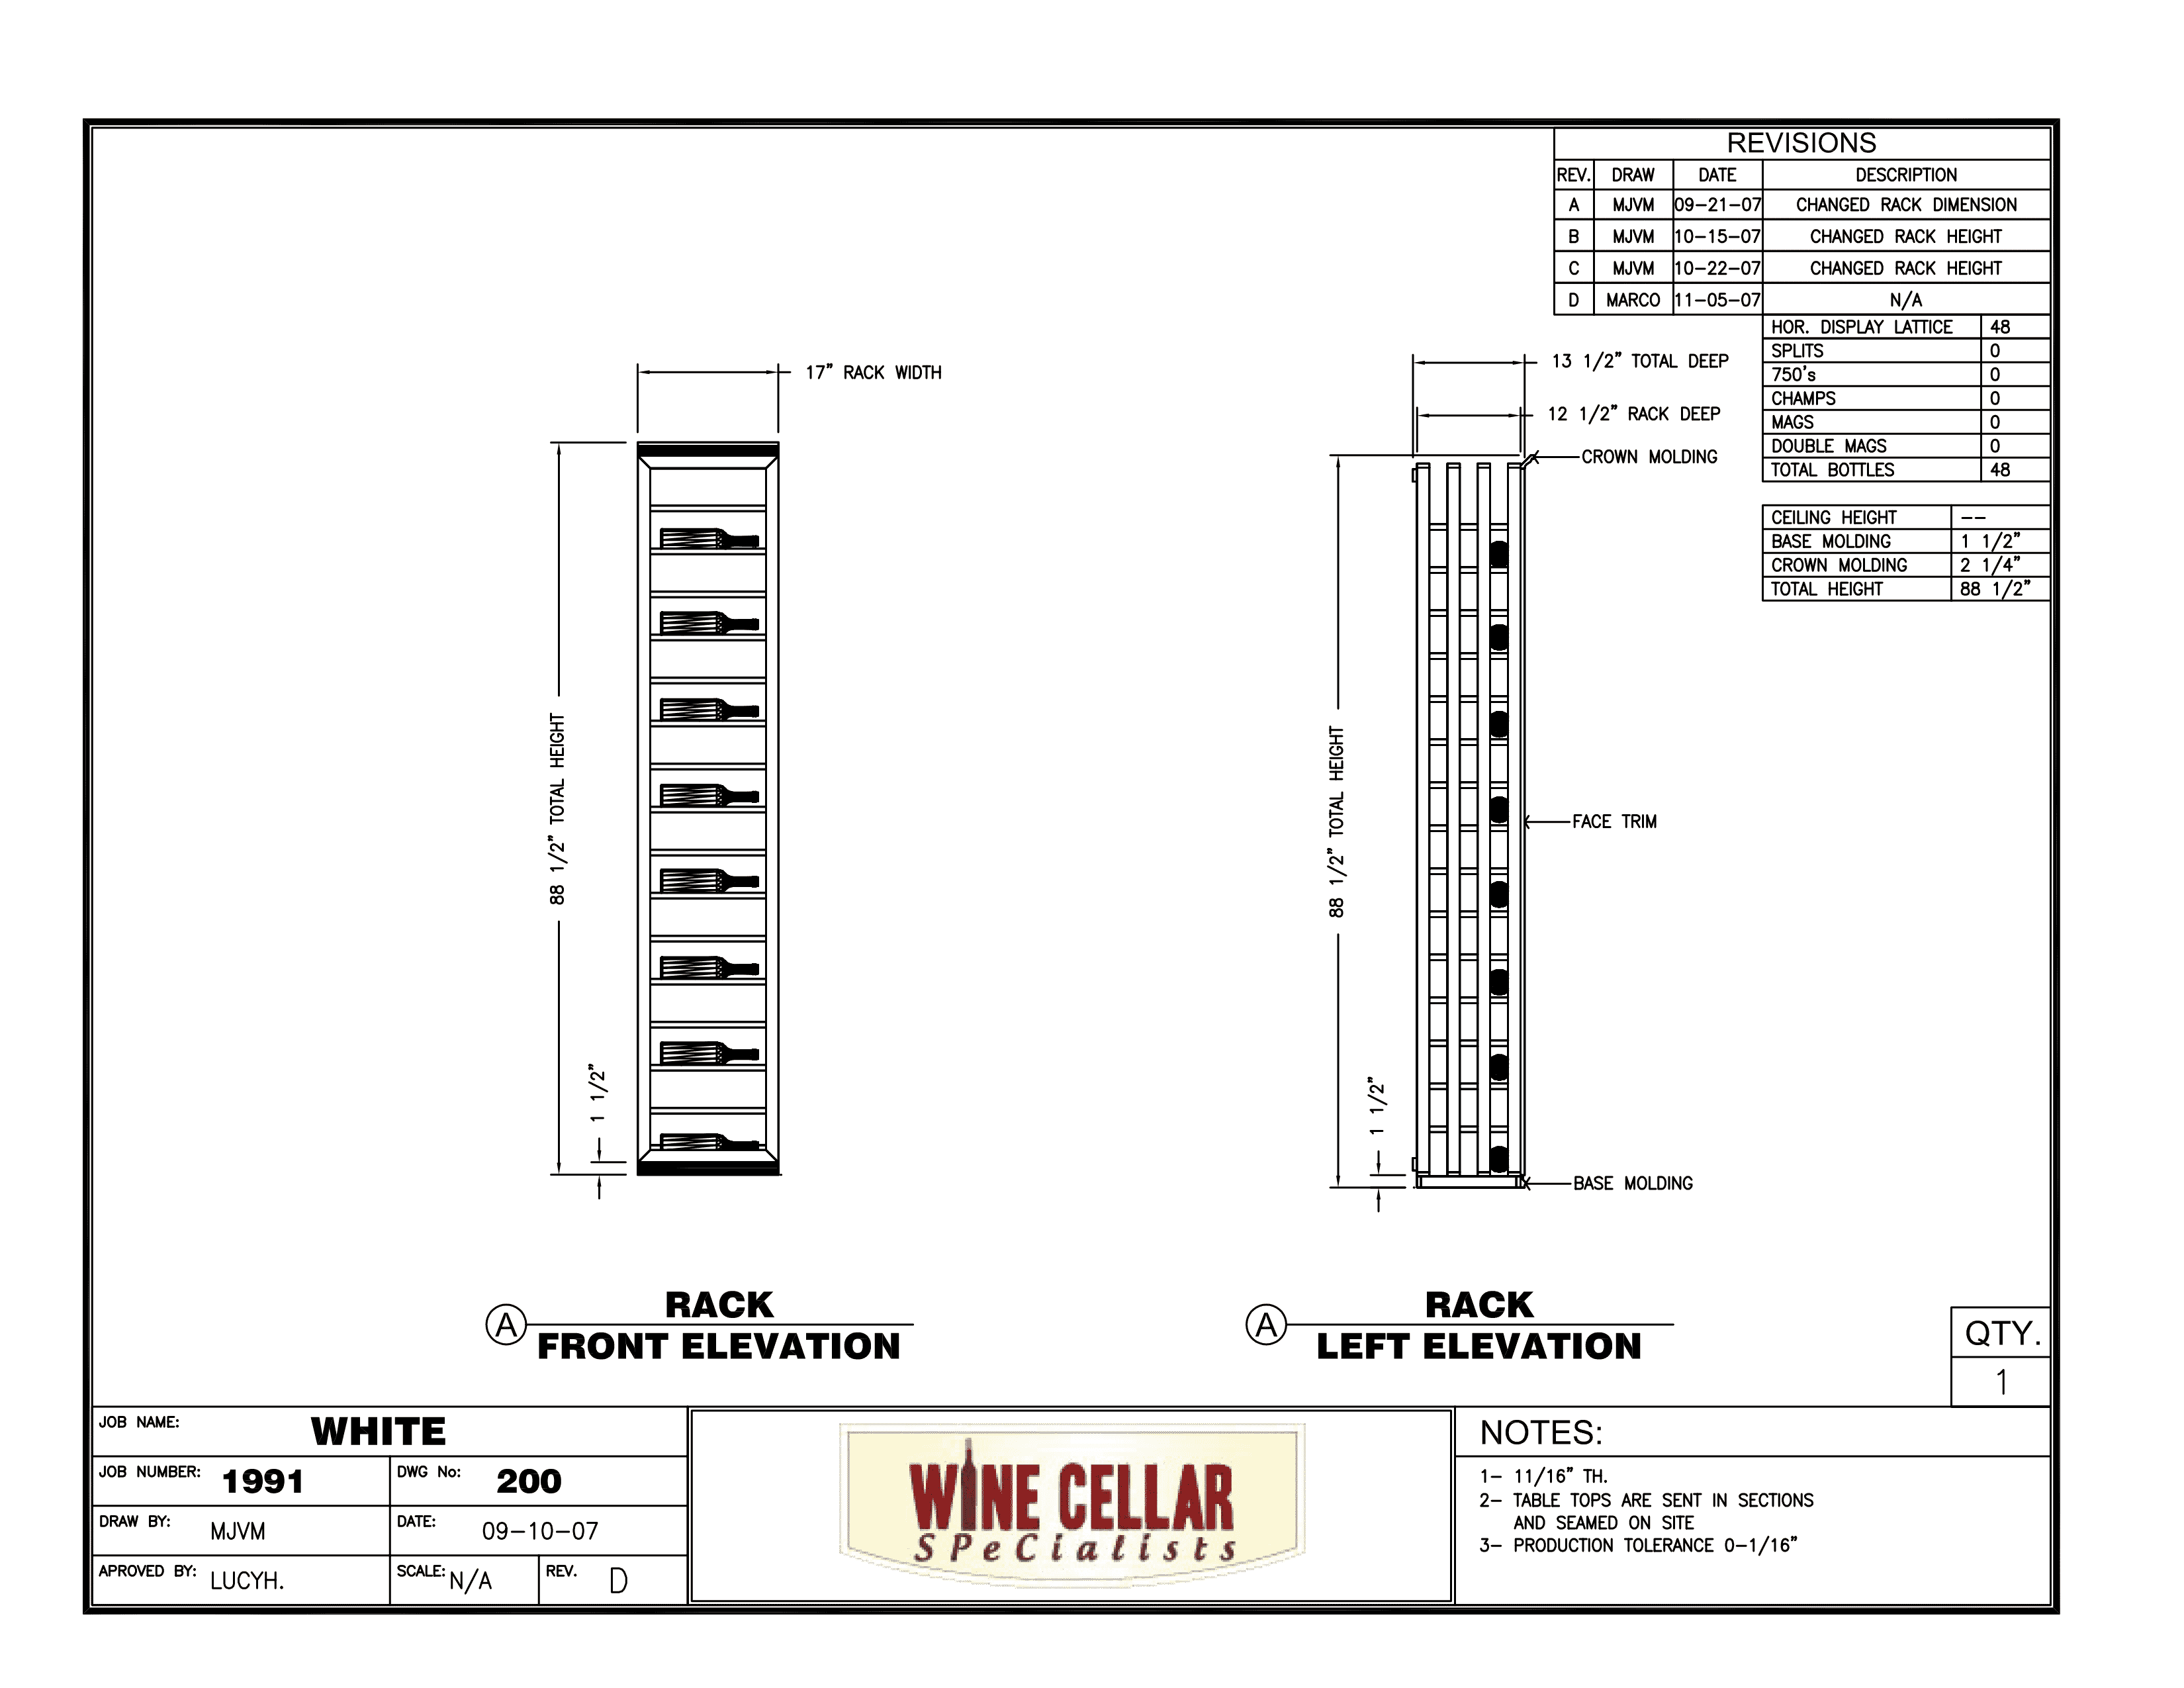
One of the more interesting design elements that we used to create a great presentation of the wine bottles was to make use of lattice horizontal wine racking. Horizontal wine racks are great because they can be several or just single deep. Three deep measures 131/2 ” or if single, they only measure 6″ in depth. This allowed more storage and display racking where otherwise there would simply not have been enough room to have storage on both walls. Horizontal style wine racks also have the benefit of a label forward presentation of the wine bottles making it very easy to manage a wine collection.

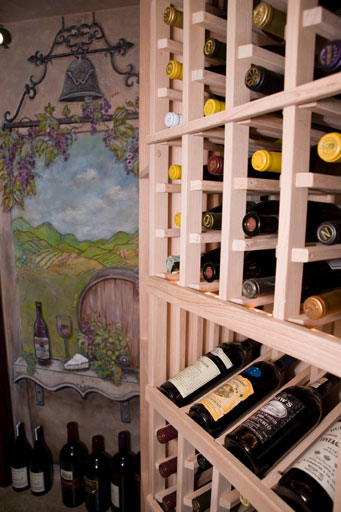
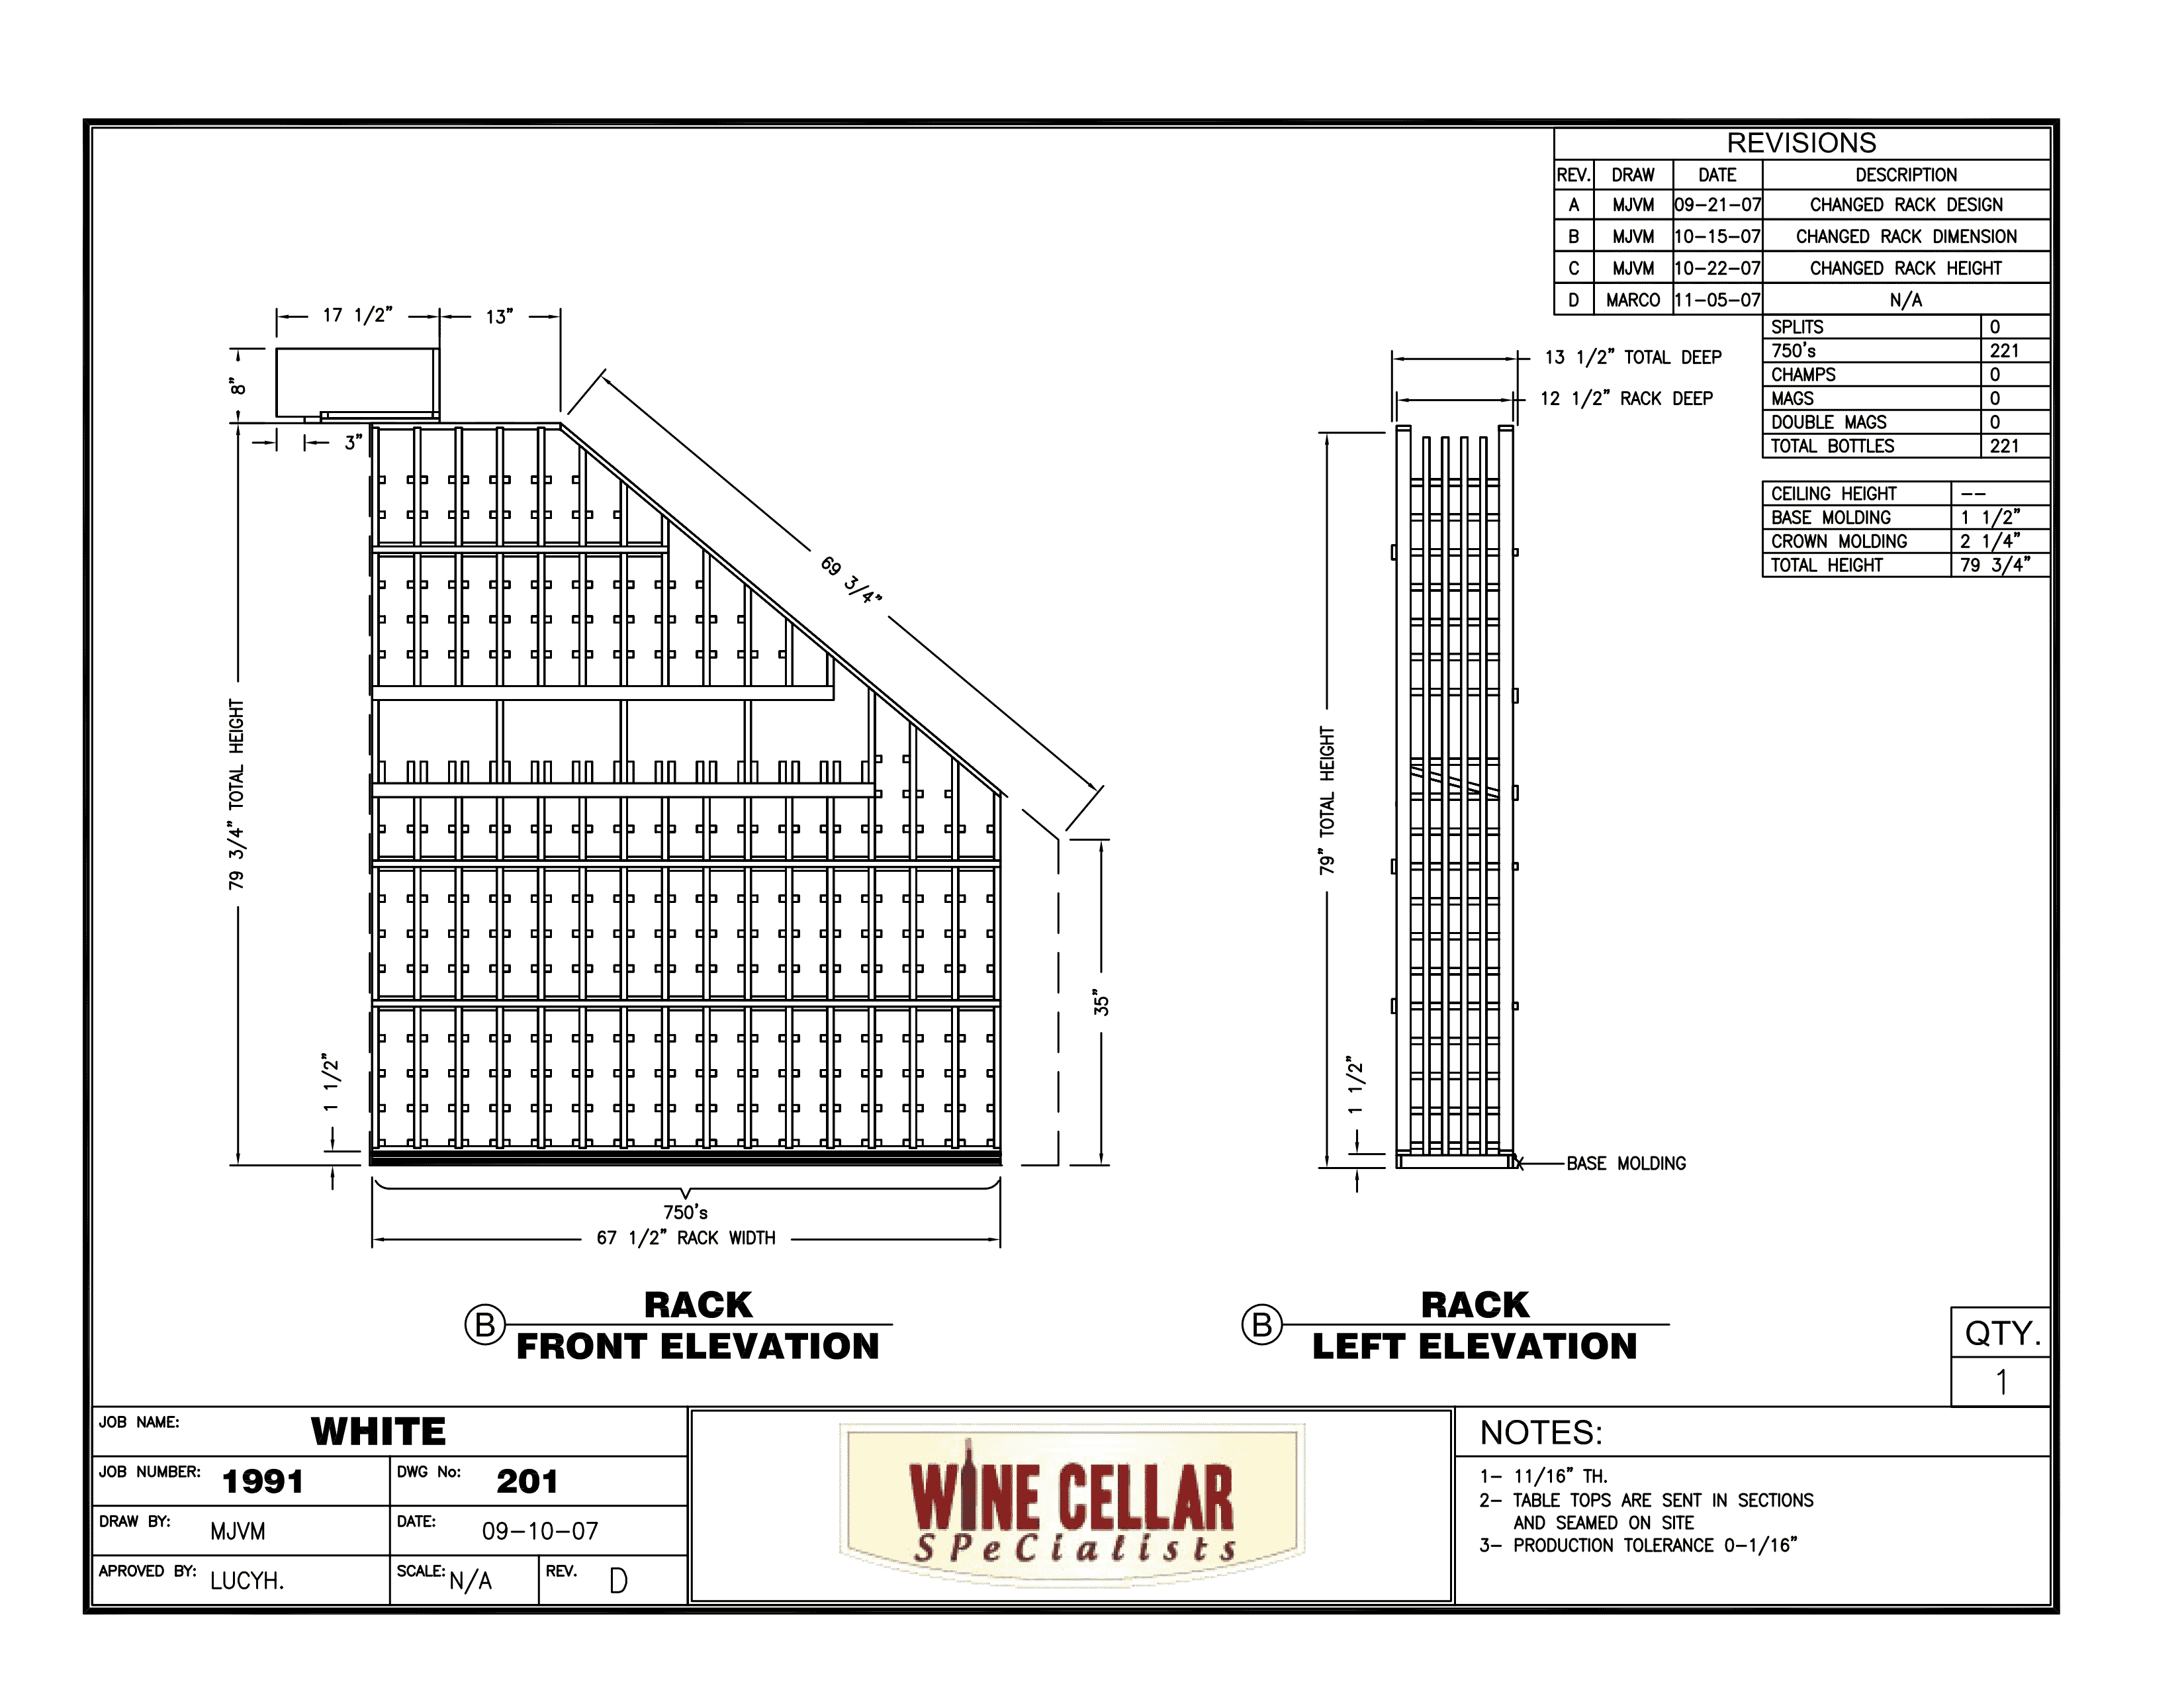
Where the ceiling slanted under the stairs we waterfalled standard 750ml wine racking. We added to this a high reveal display row with special LED wine cellar lighting for aesthetic purposes and to allow the presentation of selected wines. All the custom wine racks had crown and base moldings added with a toe kick to bring the racks off the floor. These extra elements really finish the racks and create a fully customized look. Lastly we added a triangular shaped quarter round display shelf set for continuity between racks and to allow further feature displays. All the wine cellar racks were constructed in mahogany and left unfinished.
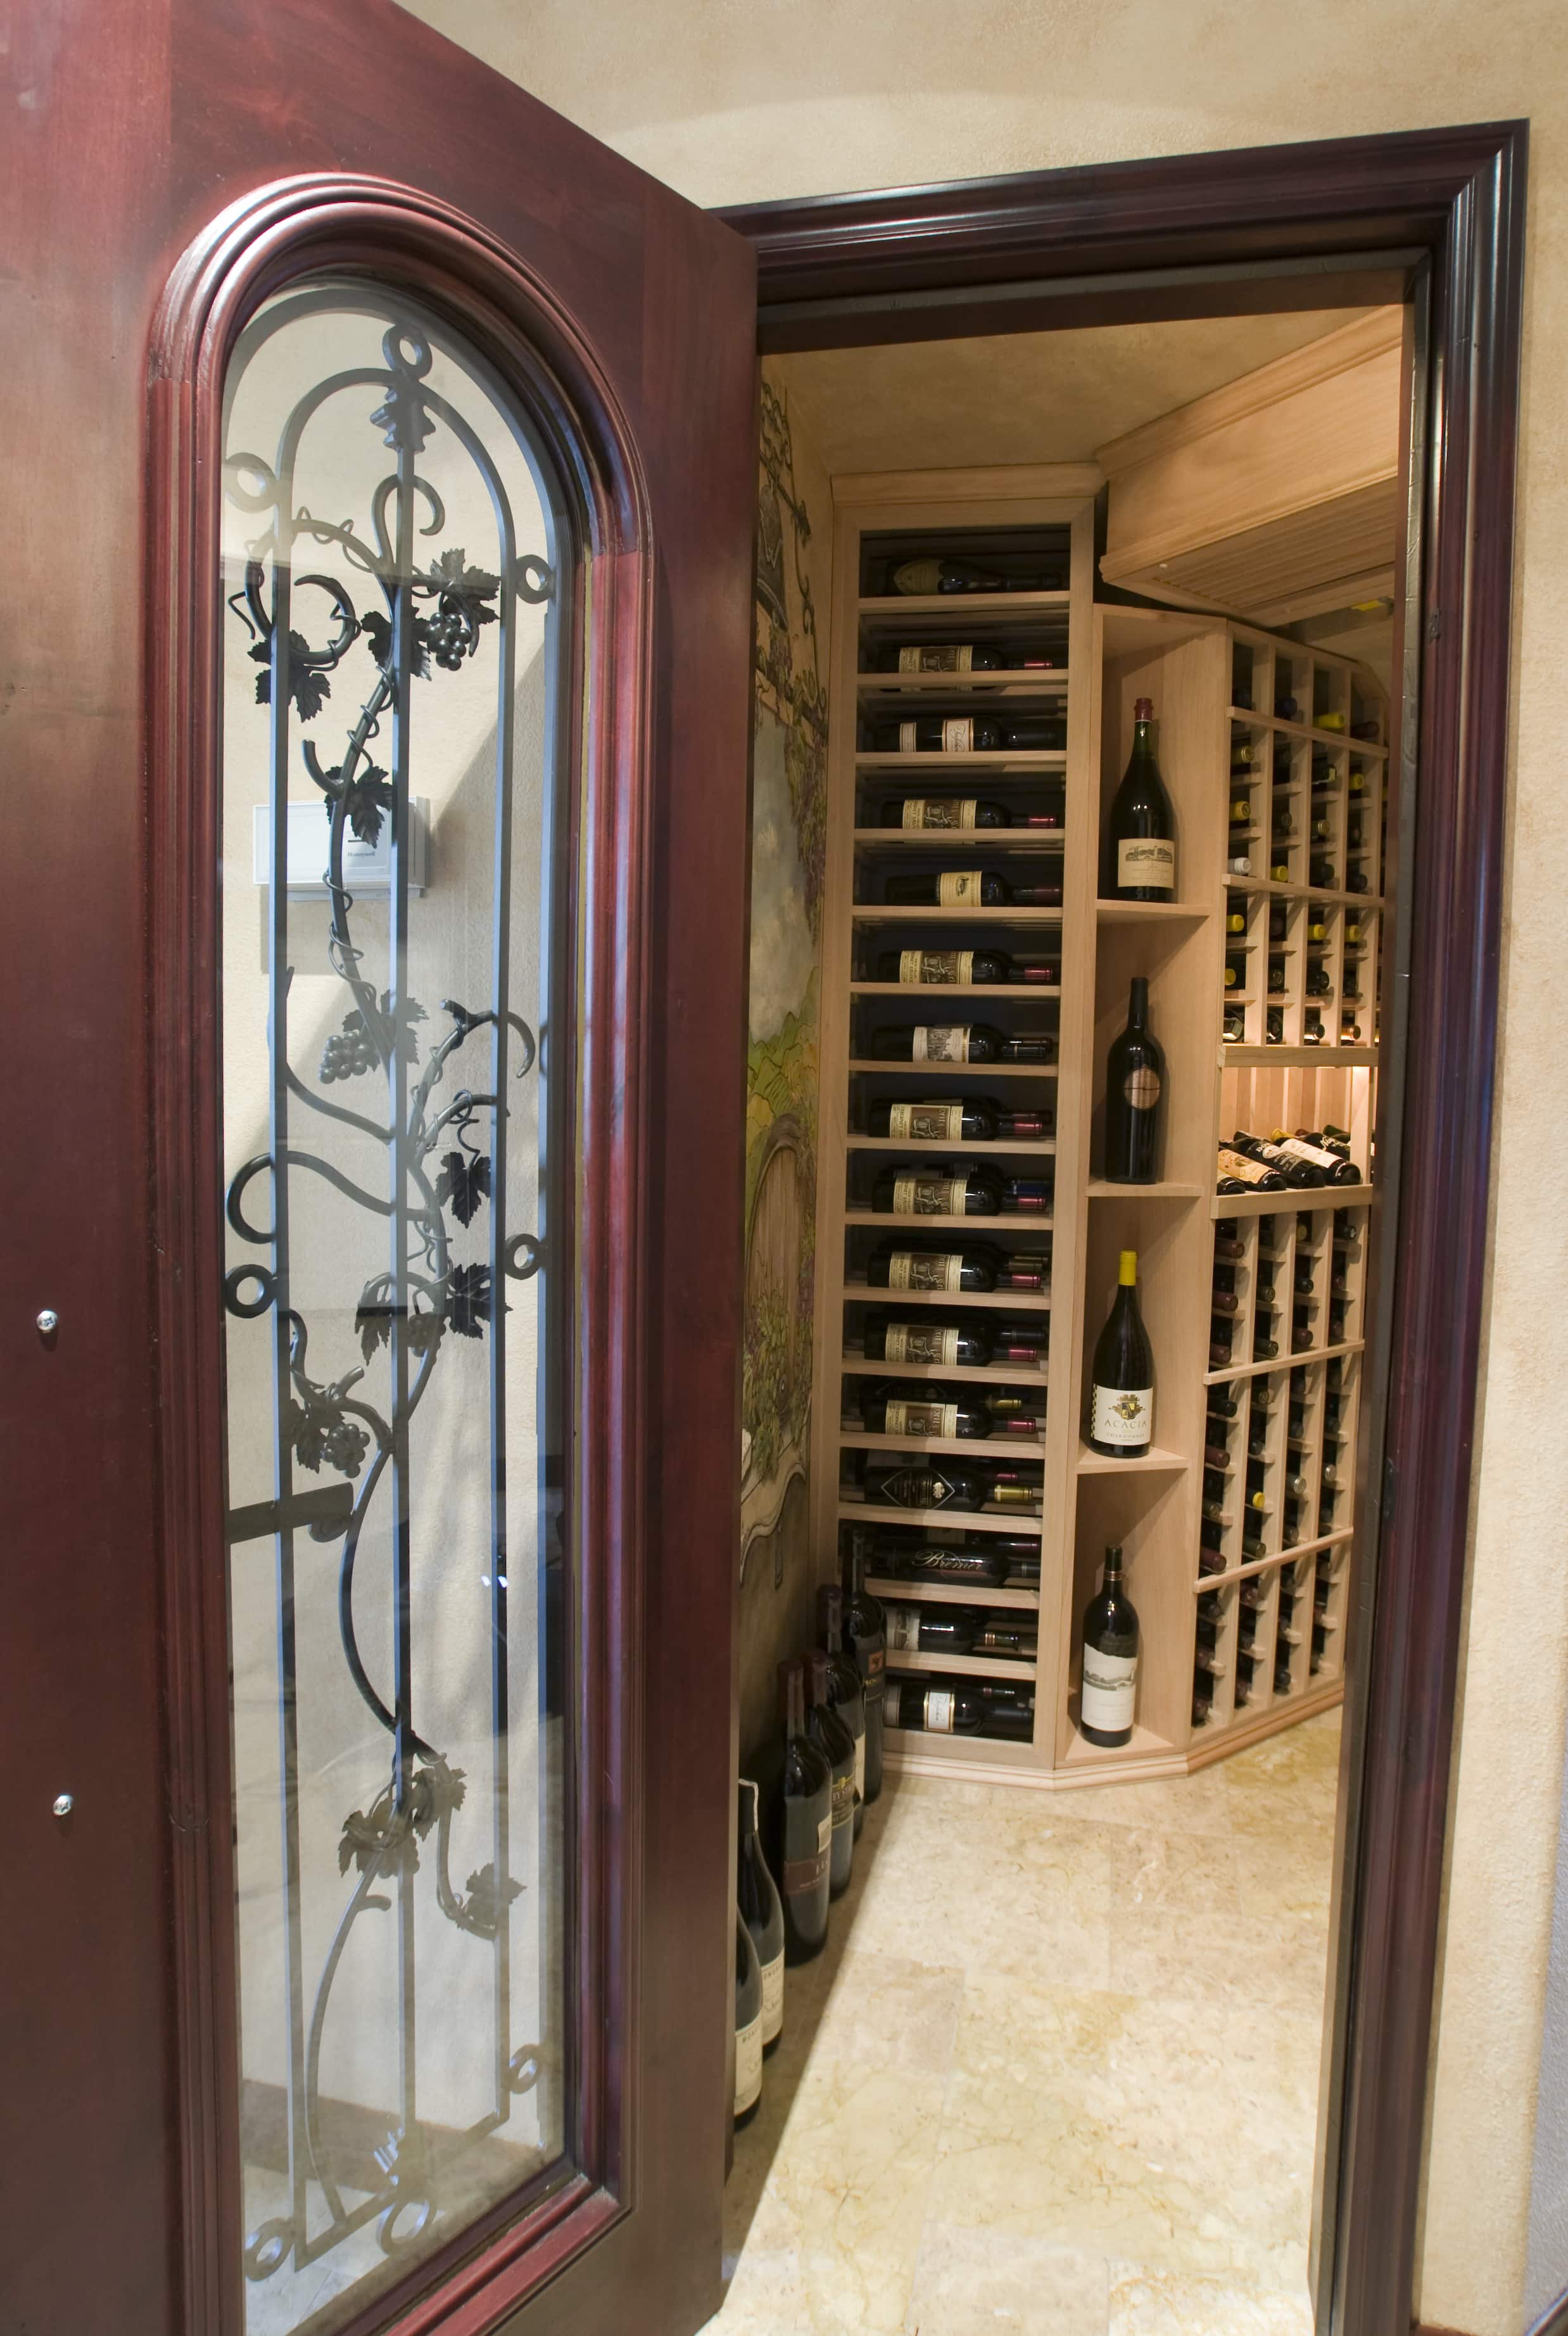
Wine cellar doorsare also very important in that they need to insulate and completely seal the wine room’s cooled climate from the rest of the house. This door was a purpose built Tuscan custom wine cellar door. It had arched dual pane glass, finished with a hand forged wrought iron grape vine design, creating a stunning entry to the wine cellar. The wrought iron can of course be fully opened for cleaning purposes.
The wine cellar refrigeration system we used was an RM 2600 cooling unit from wine cellar refrigeration systems. The advantage of the split systems for wine cellar cooling is that less space is taken up in the wine cellar itself. They can also be significantly quieter and more efficient than self-contained wine cooling systems. We also constructed a housing and a custom grill cover for the wine cellar cooling unit from the same material the wine racks were manufactured from, thereby making the cooling system virtually invisible.
If you have an oddly shaped area in your home that you may be considering converting into a wine storage area, feel free to make use of our free, no obligation, wine cellar design service. Simply complete a simple wine cellar design form or go ahead and call us at our Chicago Design Office +1 (773) 234-0112. We would be more than happy to get you started.
If you would like to see more Chicago custom wine cellar projects, visit our wine cellar gallery where you will find many more project details and videos.
Home Wine Rooms Chicago Illinois White Project Drawings
Original article and pictures take http://www.winecellarspec.com/custom-wine-cellars-chicago-illinois-under-staircase-project-white/ site
понедельник, 26 марта 2018 г.
Solid Pine Concealed Gun Storage, Gun Storage, Hidden Gun Storage, Monogram Family Name Sign
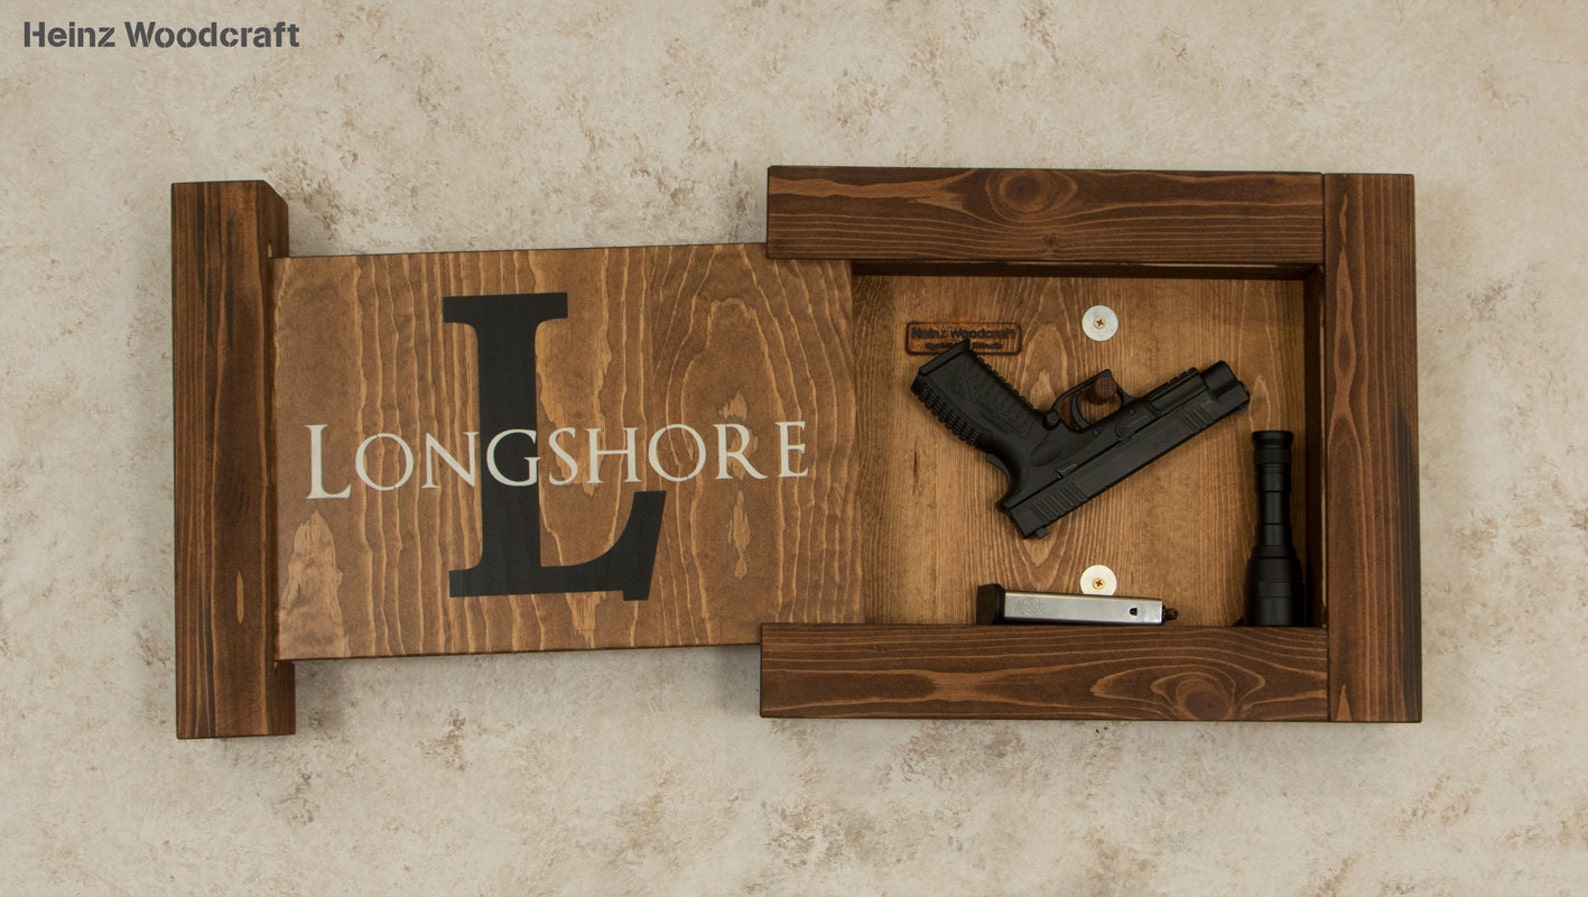
These concealed storage signs are hand crafted with solid pine frames and panels. Designed to be discrete these are perfect for safe storage of your home defense weapon in any room of the house. Most homes have a single safe storage area for their home defense weapons. Our concealed storage signs give you a way to safely and discretely store your home defense weapon in any room of the house giving you instant access if it is ever needed.
Every detail was considered in the design and construction of these unique concealed storage signs. The signs have a pressure latching mechanism to keep the sliding face closed tight. A set of stop blocks ensure that the sliding face can not be removed or fall out when being opened. The back plate offsets the sign frame from the wall about 1/8" to ensure that the sliding face doesn't rub on the wall.
The standard size for our solid pine sign is 20″ wide x 15″ high x 3-1/4″ deep and will fit most hand guns. The signs are designed to be mounted to the wall by securing through the back plate. Mounting instructions and hardware are provided.
You can add our invisible locking system option allowing for safe storage of your weapon in any home. The unique locking design uses a strong rare earth magnet to allow access into the concealed storage sign. The magnet is hidden on the sign itself... incorporated into one of the wood plugs on the side of the sign. You will never need to search for your key if you need immediate access to your home defense weapon.
When placing an order just tell us what Monogram Letter and Name you need in the notes section during checkout. We will provide a minimum of three choices of artworks with different font layouts for your approval. Please contact us before placing an order to discuss custom artwork if you would prefer something different than a monogram and family name.
Each of our concealed storage signs are custom built per order and are hand made using natural materials so the overall appearance and color will vary from the photos in the listing.
Original article and pictures take https://www.etsy.com/listing/463536155/solid-pine-concealed-storage-gun-storage?ref=unav_listing-other site
суббота, 3 марта 2018 г.
Turning a water heater closet into a custom wine cellar in Coral Gables, Fl (DIY)

Charlie Sampera is a lot of things: A business owner, an engineer, and a “frustrated” architect. He happens to love a good DIY project, like this custom wine cellar.
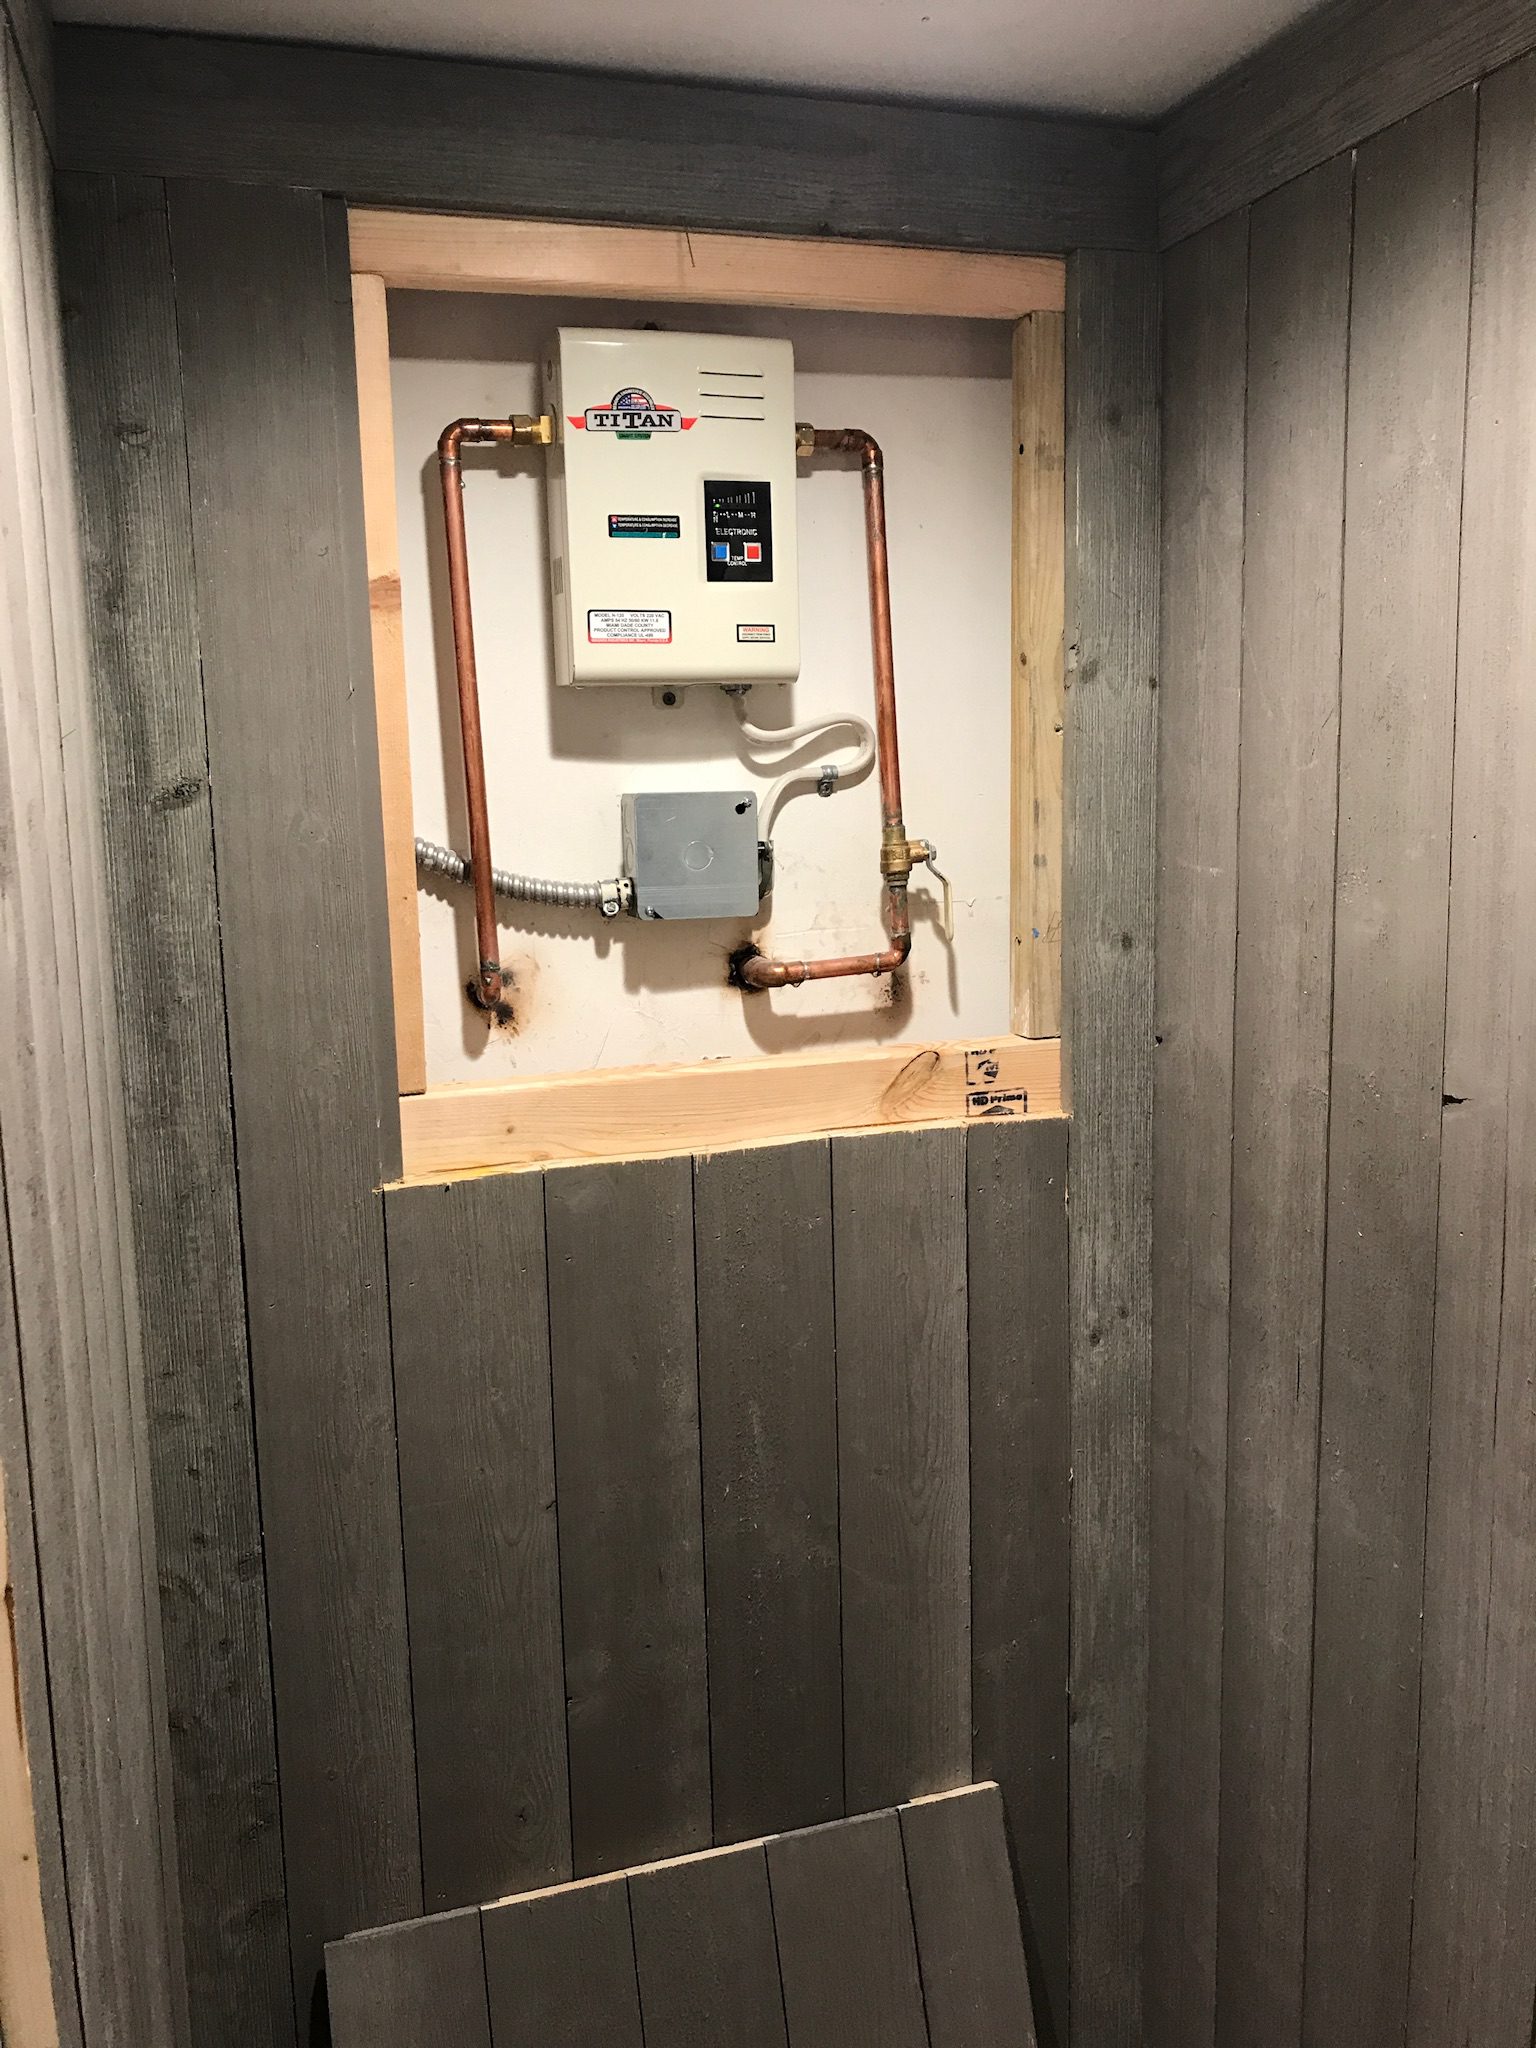
So he was the perfect person to tackle an innovative closet conversion project, turning an old water heater room into a tasteful, cleverly cooled custom wine cellar (that still managed to heat the home’s water). This 84-bottle project has so many great design gems to inspire any other wine drinkers out there.
- This project is featured in the 2018 catalog. Request your copy for more design like this
The most impressive idea being his switch to a tankless water heater that he hid behind wood paneling, making this a true dual-purpose room.
Some other highlights:
- Forgoing traditional cellar cooling, he piped in a direct AC vent into the small room, and monitored the airflow to get a consistent low 60s room temperature (a hybrid of climate control and passive wine cellar techniques)
- Pre-stained gray ship lap was installed on the walls for the cool texture
- Tankless water heater tucked in behind the art
- Flooring made of wine corks
While Charlie did the engineering and planning, he enlisted his wife for the decorating, and contractors for some of the more technical details. His original plan was to install a wine fridge. This project was cheaper and we think a heckuva lot better looking.
We caught up with the Coral Gables, Fl., resident on his inspiration, the wines he loves to drink, why he was rooting for a water heater failure, and more.
 |
 |
 |
 |
VintageView: You’re staring at a water heater in a rough looking closet, and you naturally think wine cellar…
Charlie Sampera: I’ve had my eye on this closet ever since we renovated the kitchen about 10 years ago, but I always thought once the water heater goes I’ll replace it with a tankless and install a standalone wine fridge. The day the water heater broke, I was ecstatic.
Once the closet was empty, a light went off in my head. I had recently toured one of my contractor friend’s new home projects on the water in Miami Beach where he had installed a beautiful, all-glass wine cellar (with VintageView racking).
Woke up early Sunday morning, made a pot of coffee, and took out my sketch pad and measuring tape. … The concept of my design was to maximize the number bottles with clear view of the labels.
VV: Scale of 1-10…how handy are you? CS: 8.5
VV: How long did this project take you?
CS: Three days. One day for plumber and electrician for the water heater replacement. One day for the cooling and door installation. One day for me to install paneling and wine racks
VV: How did you rig the cooling?
CS: I engineered it (measured temperature of air from existing vent to see if it would be cold enough to keep a sealed closet cool enough for wine) and a contractor installed vent for closet.
(NOTE: We wouldn’t consider this to be a fully climate controlled environment but it’s certainly a unique way to better control a passive-style custom wine cellar. Find out what type of cellar you need.)
VV: When you look at this closet now, what’s your reaction?
CS: It’s a total WOW! It looks like a very expensive addition to our kitchen, but it was actually much less than the wine fridge I was considering with a significantly more appealing look. Everyone who has seen it goes back home and looks for an available closet to convert.
VV: It’s Tuesday night and a pizza is on its way. What bottle are you reaching for?
CS: Orin Swift Abstract or Saldo
VV: How about a special occasion?
CS: Too many to choose from, but you asked. Extremely special? The Dominos on the top shelf. Everyday special occasions? Caymus Cab, Silver Oak Napa or maybe a bottle of Papillon.
Custom Wine Cellar Details
- 84 bottle capacity
- Estimated Racking Cost: $900 (~$10/btl)
Original article and pictures take http://vintageview.com/blog/turning-water-heater-closet-custom-wine-cellar-diy-project-coral-gables-fl/ site
воскресенье, 18 февраля 2018 г.
Carport Apartment Plan, 085G-0005

Click to enlarge. Views may vary slightly from working drawings. Refer to floor plan for actual layout.
Plan Details |
Plan Description
- Stunning modern carport plan with comfortable apartment
- Carport provides shelter for one automobile and a storage closet
- Beyond the relaxing garden and pergola lies a comfortable apartment
- Living quarters deliver an open floor plan with kitchen island and snack bar, a comfortable bedroom, full bath, walk-in closet and room for a stackable washer/dryer
- Wall framing for unheated areas calls for double 2x4s that are separated to achieve a 12” thickness
- Apartment wall framing is 2x6
Order Plan
| PDF File (Best Value) Electronic file of the construction drawing delivered by email to the customer usually within 24-48 hours of purchasing (during regular business hours.) Includes a copyright release to print the blueprints needed for construction. Copies can be printed on 8 1/2" x 11" sheets right from your computer or take the file to a blueprint shop and print full sized garage plans for construction. Saves time and shipping costs. Note: Some of our designers require customers to sign and return a licensing agreement before the plans are emailed. | $1,050.00 |
Foundation
Exterior Wall
Other Options
Processing and Shipping
Processing and shipping fees are calculated per plan, and not per total order. Rates are subject to change without notice.
| Continental US | Canada | AK/HI | *International |
| *Please Note: International orders may take up to 3 weeks for delivery. |
Original article and pictures take https://www.thegarageplanshop.com/085g-0005.php site
пятница, 9 февраля 2018 г.
Custom Wine Walls | Cabinets | Closets
“Luxury residential and commercial wine cabinets.”

Retrofitting an existing closet, cutout or niche into a climate-controlled wine wall / wine cabinet /wine closet is an excellent way to turn an otherwise unremarkable space in your home into a showpiece capable of storing your wine collection at correct temperature and humidity.
Genuwine Cellars specializes in the design, engineering, fabrication and installation of custom wine-walls, -cabinets, and -closets.
Options abound and include your choice of:
- Wine Racking Styles:
- Modern Racking (PEG System | Label Link | Label Ladder | The Ring / The Cube)
- Wall / Cabinet / Closet Construction:
- Seamless Floor-to-Ceiling Display (with cooling unit located remotely)
- Display with Integrated Bulkhead (fitted with “through-the-wall” cooling unit)
- Genuwine Cellars’s specified and supplied enclosure (insulated and vapor barrier’ed)
- Material and Finish:
- Premium or Exotic Wood Species
- Metal/Chrome/Stone Veneers
- Specialty Materials
- Door Styles:
- Glass Wall and Door System
- Wine Cellar-Grade Display Doors with Glass Inserts
- Glass:
- Standard Glass
- Thermal Glass
- U/V Protected Glass
- Ultra Clear (Low-E) Glass
- Climate Control:
- Entry-Level “Through-the-Wall” Units (built into custom bulkhead)
- Commercial-Grade Cooling Units
- Add On Humidity Control
- Lighting:
- LED Display Lighting
- Designer Integrated Lighting (e.g., integrated light panels/strips; back-lit glass; etc.)
As the above list suggests, dimensions, capacity and costs are highly variable.
Please note that numerous challenges confront the design and build of a custom enclosed wine wall / cabinet; every one is unique in some manner and requires special attention in order to make it functional.
Potential clients (and their builders) often underestimate the complexities involved, largely because walls / closets / cabinets present several pitfalls that are not readily obvious or intuitive. As most cooling unit manufacturers will attest, the failure rate for cooling units installed into wine closets by inexperienced and uninformed builders is alarmingly high, and ultimately results in higher costs for their clients as we are called in after the fact to make things right.
All custom wine walls / cabinets / closets are unique in their size, materials, design, engineering and capacity. With over twenty years of experience, we know the pitfalls to avoid. We can engineer a system that will work and we will produce a turnkey solution precision-fitted to your space.
Gallery:
Original article and pictures take http://www.genuwinecellars.com/wine-cellars/custom-wine-wallscabinetsclosets/ site
воскресенье, 28 января 2018 г.
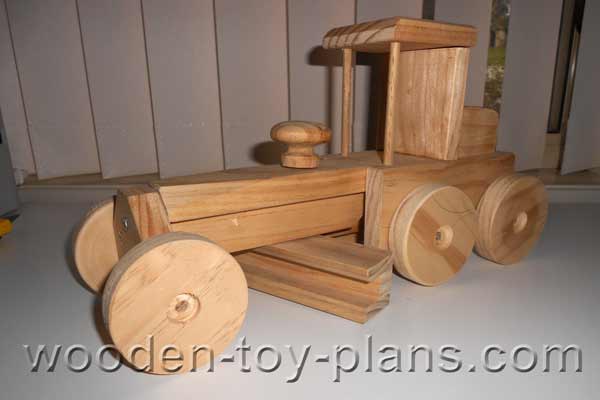
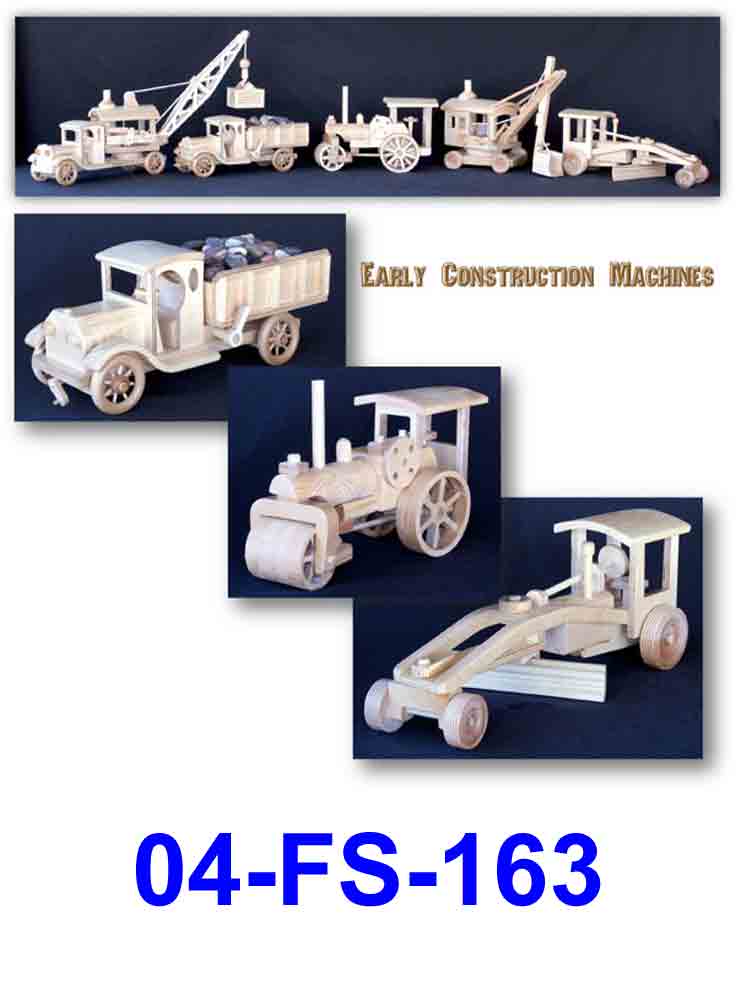
WOODEN CONSTRUCTION TOYS
Woodworkers with a passion for making wooden construction toys will love these chunky model toys.
Designed and built to last, these wooden toys make the perfect "made with love" gift for children.

Make this delightful toy grader with this free plan, complete with step by step instructions, diagrams and photos.
There is just enough detail to stimulate the imagination of children and adults alike.
Tools
This construction toy can be made with just a few tools.
A cordless drill is a tool that I use most often and as a bonus, it also useful for driving screws for carpentry work.
Shop for cordless drill on eBay
You may also need the following items to complete the project:
- Hacksaw to cut the dowel axles to length.
- Wood file to round over all the edges.
- Sanding block with 120 and 80 grit sandpaper.
- A selection of drill bits.
A 12 inch disc sander or linisher with sanding disk attachment is very useful for trimming up end grain and squaring off small pieces of wood.
If you are going to make your own wheels for this wooden construction toy, a drill press is recommended. You will also need a 16mm spade bit, a 6mm drill bit and a circle cutter modified to cut wheels instead of holes.
Materials
This wooden construction toy can be made with bits of wood left over from other projects.
I made mine from a piece of left over pine 19mm thick by 140mm wide by 500mm long. The wheels were also cut out of 19mm pine by 140mm wide.
For the six wheels, I used a piece less than 200mm in length, and the extra length was useful in clamping the piece while using the circle cutter.
The blade of the grader was made with a piece of skirting board 200mm long.
For the axles, use 6mm dowel.
Step by Step Instructions
Download a print ready PDF copy of the construction toy plans.

Dry clamp parts A and B together, keeping the two parts B aligned with the axle dowels. Mark the pieces so that it will be re-assembled in the correct order. It is shown in red in the photo only to highlight the idea, so don't actually mark it in red. Apply the glue, clamp it and put to one side.
It is important that the axle dowels are left in place until the glue sets to minimize creep under clamping pressure. Once the glue has set, re-drill the holes to allow the axles to spin freely.

The blade of the grader, part C, is made from a piece of skirting board cut to a width of 30mm. It may also be made from a piece of timber that is 9mm thick, just chamfer one edge to the profile shown in the drawing.

Cut and trim part D to size, and drill the axle hole using a drill press or drill guide. Use the 6.5mm drill bit to allow the axle to spin freely.

Drill the holes for the roof of the cab by placing it on the body as shown in the photo.

The photo shows how to fix the dowels on place by measuring the height the dowels are set so that they sit slightly above the roof. This is an idea borrowed from the Craftsman furniture movement.
Final Assembly
Glue the roof and engine block in place. Once the glue has set, lightly sand the whole toy with 220 grit sandpaper, removing all the sharp corners.
Attach the wheels with a small dab of glue.
Painting and Finishing
Leave it in it's natural state, or apply your favourite finish. I used yellow food colouring for a bright yellow finish. To make the wheels black, I mixed all the food colours together.
For information on food safe finishes and dyes, visit U-Beaut.com.au includes links to international suppliers.
More Wooden Construction Toys

Construction toy plans easy build steam roller.
Price: Free
Large toy road grader, about 20% bigger than the original version of the road grader.
Price: Free

More free wooden toy plans includes tipper trucks, airplanes, cars even a batmobile.
Visit the woodworking projects gallery to view projects from people all around the world.
Original article and pictures take https://www.wooden-toy-plans.com/wooden_construction_toys.html site